
So verwenden Sie iCloud zum Synchronisieren von Notizen auf allen Geräten [2024]
- Apple Notes lässt sich nahtlos in iCloud integrieren, sodass Sie auf allen Apple-Geräten und auf iCloud.com auf Ihre Notizen zugreifen können.
- Es bietet eine Reihe von Funktionen, darunter Textformatierung, Checklisten, Anhänge und Optionen für die Zusammenarbeit, was es zu einem vielseitigen Werkzeug zum Organisieren von Gedanken, Aufgaben und Ideen macht.
- Sie können von verschiedenen Plattformen aus auf Apple Notes und iCloud zugreifen, darunter iOS, macOS, Windows und Android, was eine flexible Notizenerstellung und Zugänglichkeit ermöglicht.
In unserem digitalen Zeitalter ist es wichtig, organisiert zu bleiben. Apple Notes bietet eine praktische Lösung für die nahtlose Verwaltung Ihrer Gedanken, Ideen und Aufgabenlisten auf allen Ihren Geräten. Egal, ob Sie ein iPhone, iPad, Mac oder sogar einen Windows-PC oder ein Android-Gerät verwenden, Notes sorgt dafür, dass Ihre Inhalte überall synchronisiert und zugänglich sind.
In diesem Leitfaden führen wir Sie durch die Grundlagen des Zugriffs auf und der Verwendung von Notizen, erfahren, wie Sie Ihre Notizen auf verschiedenen Plattformen synchronisieren und geben Ihnen nebenbei einige praktische Tipps und Ratschläge zur Fehlerbehebung. Lass uns eintauchen!
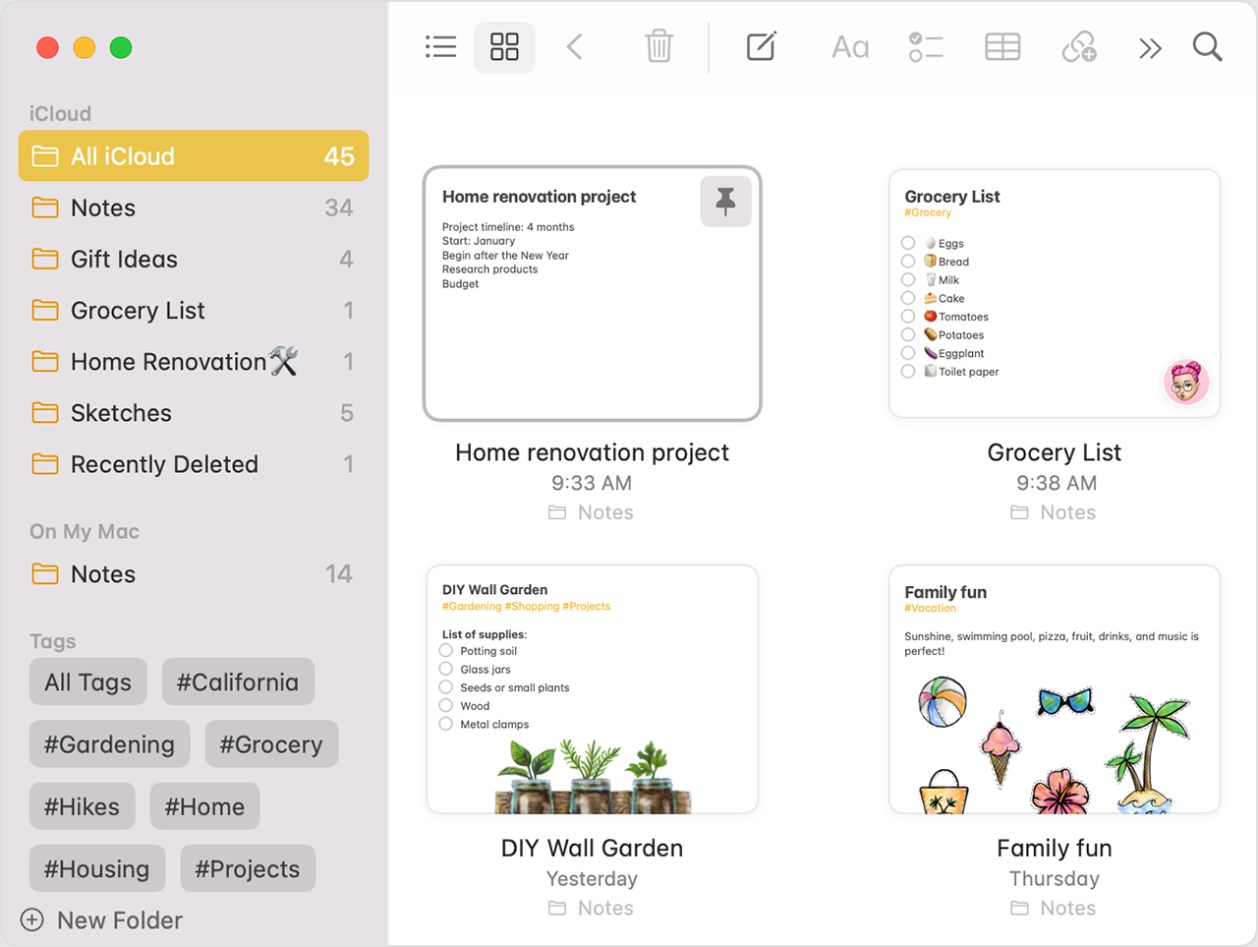 Notizen-App
Warum Notizen in iCloud verwenden?
Verwenden von Notizen zu iCloud.com bietet mehrere überzeugende Vorteile:
- Barrierefreiheit: Zugriff auf Notizen von jedem Webbrowser aus.
- Plattformübergreifende Kompatibilität: Funktioniert auf verschiedenen Geräten und Plattformen.
- Sicherung und Wiederherstellung: Sichert Notizen automatisch für zusätzliche Sicherheit.
- Zusammenarbeit: Teilen Sie Notizen und Ordner für eine reibungslose Teamarbeit.
- Komfort: Intuitive Benutzeroberfläche für einfache Organisation und Suche.
LESEN SIE MEHR: So importieren Sie alle Ihre iCloud-Fotos in Google Fotos ➜
So greifen Sie auf Notizen in iCloud zu und verwenden sie
iCloud bietet eine praktische Plattform zum Verwalten von Notizen auf verschiedenen Geräten. Hier finden Sie eine Anleitung zum effektiven Zugriff auf und deren Nutzung von Notizen:
Schritt 1: Notizen erstellen
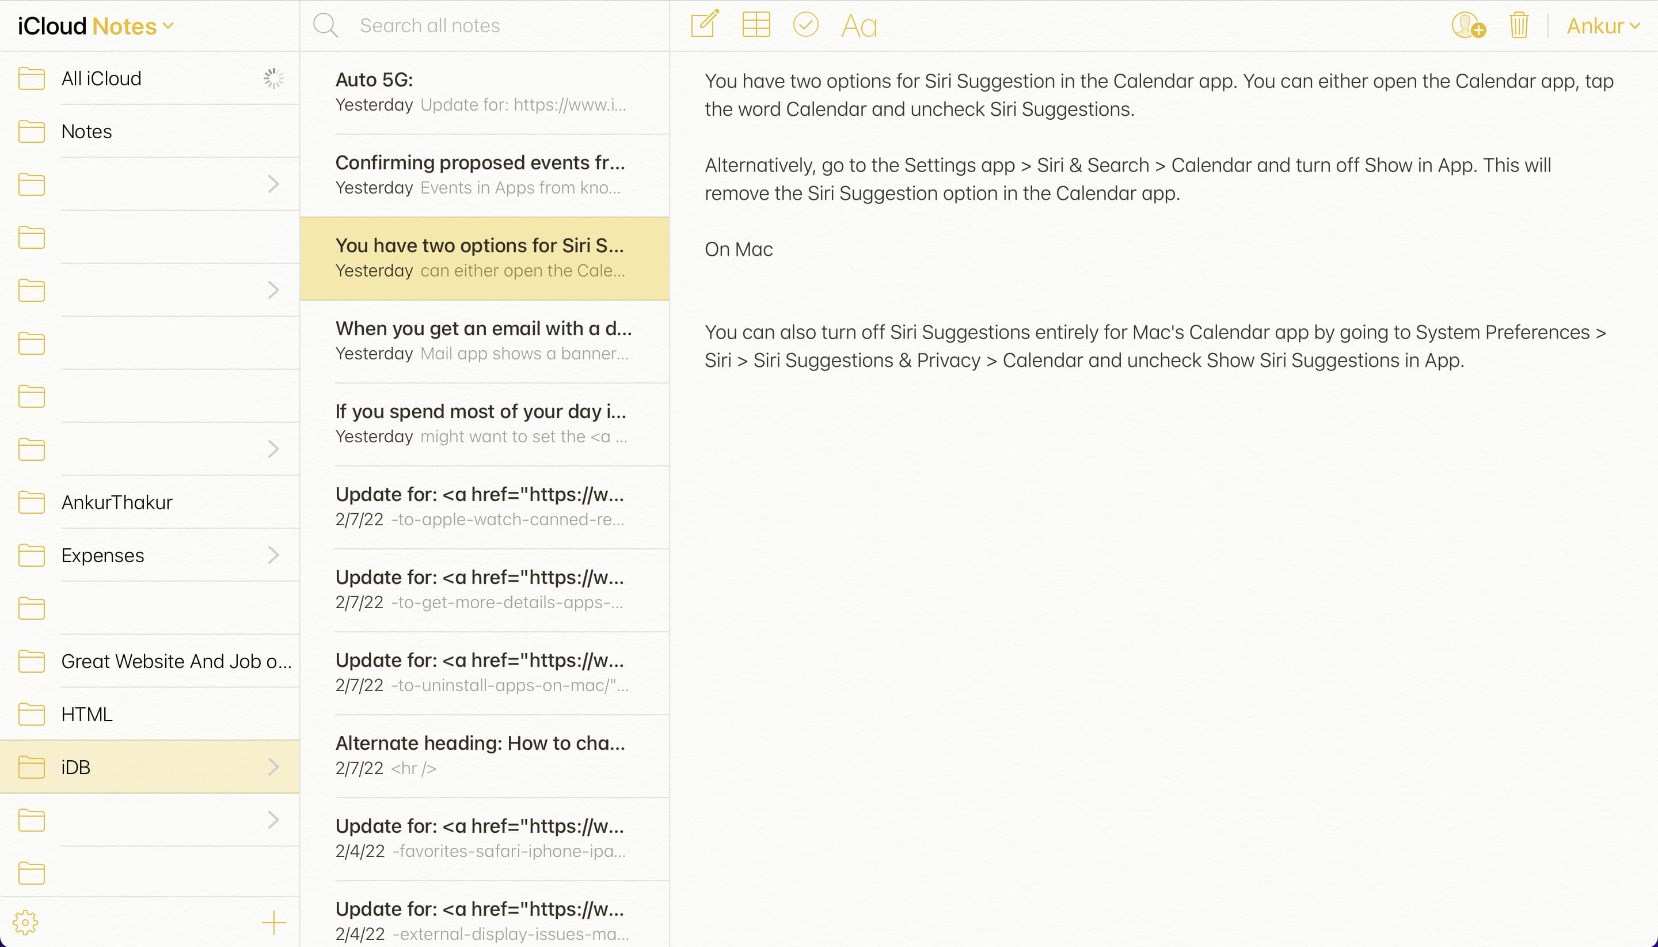
Sie können ganz einfach eine neue Notiz erstellen und die Formatierung in Notizen auf iCloud.com anpassen. Notizen sind nach dem Datum der letzten Änderung geordnet, wobei die aktuellste Notiz oben angezeigt wird.
So erstellen Sie eine neue Notiz auf iCloud.com:
- Klicken Sie auf der Startseite von iCloud.com auf die Schaltfläche „Neue Notiz“ in der Ecke
Notizenkachel. Klicken Sie auf die Schaltfläche
 - Beginnen Sie mit der Eingabe Ihrer Notiz.
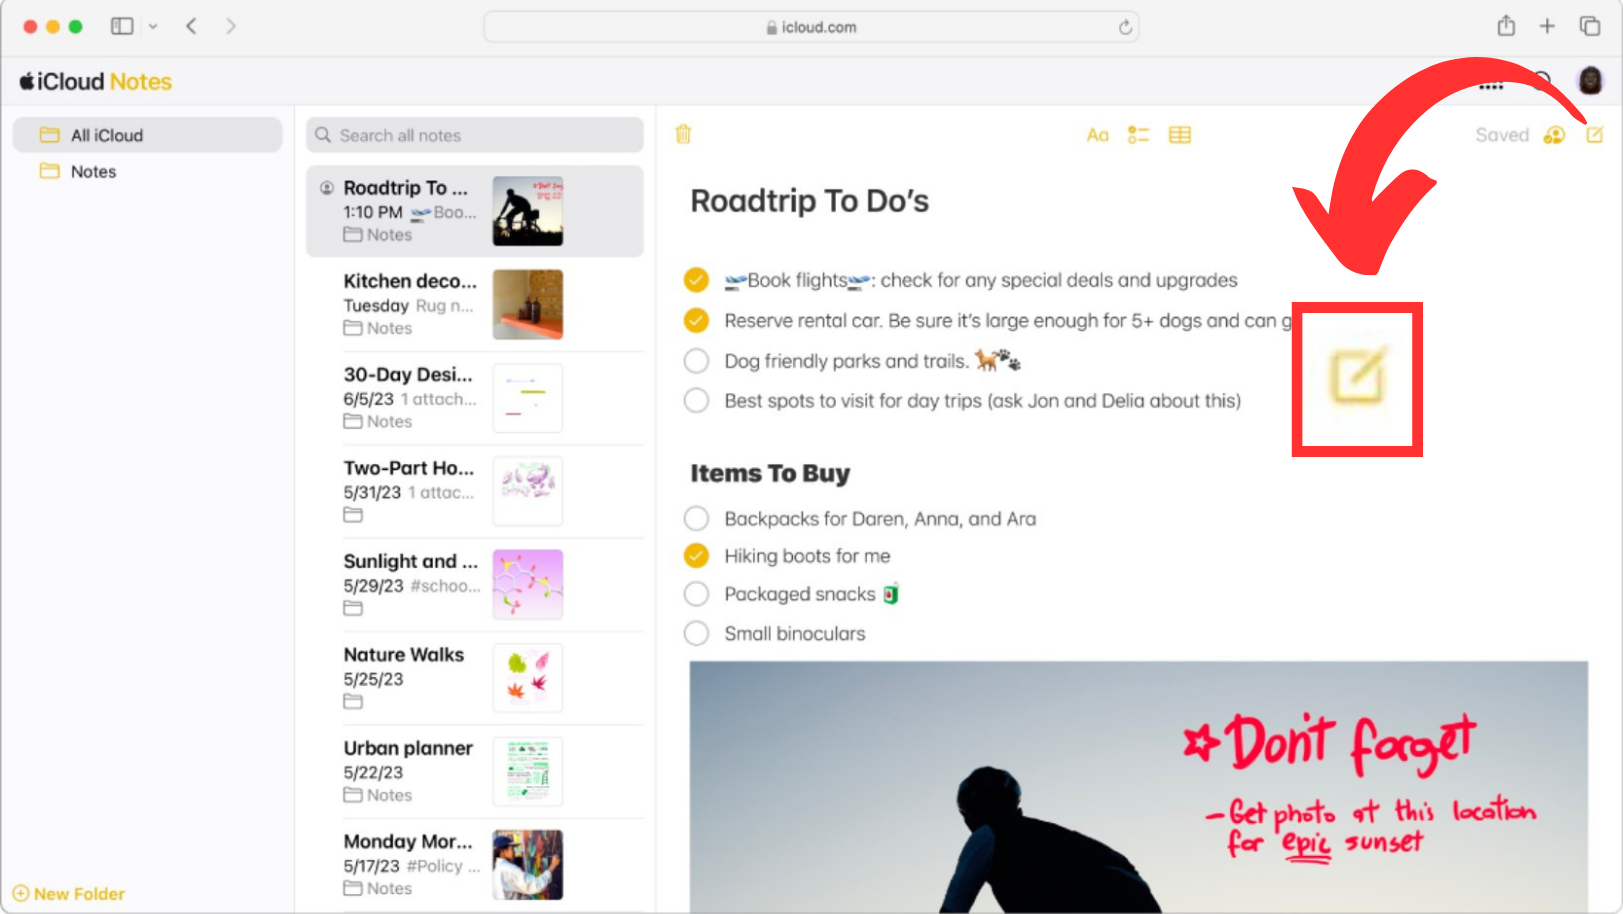 Klicken Sie auf die Schaltfläche
Ihre Änderungen werden automatisch gespeichert und Ihre neue Notiz wird in der Notizenliste angezeigt, gekennzeichnet durch den ursprünglichen Text.
Schritt 2: Notizen formatieren
So formatieren Sie Zeilen oder Wörter innerhalb einer Notiz:
- Wählen Sie den Text aus, den Sie formatieren möchten.
- Klicken Sie in der Notizen-Symbolleiste auf die Schaltfläche „Stil auswählen“.Klicken Sie auf die Schaltfläche
- Wählen Sie die gewünschte Formatierungsoption.
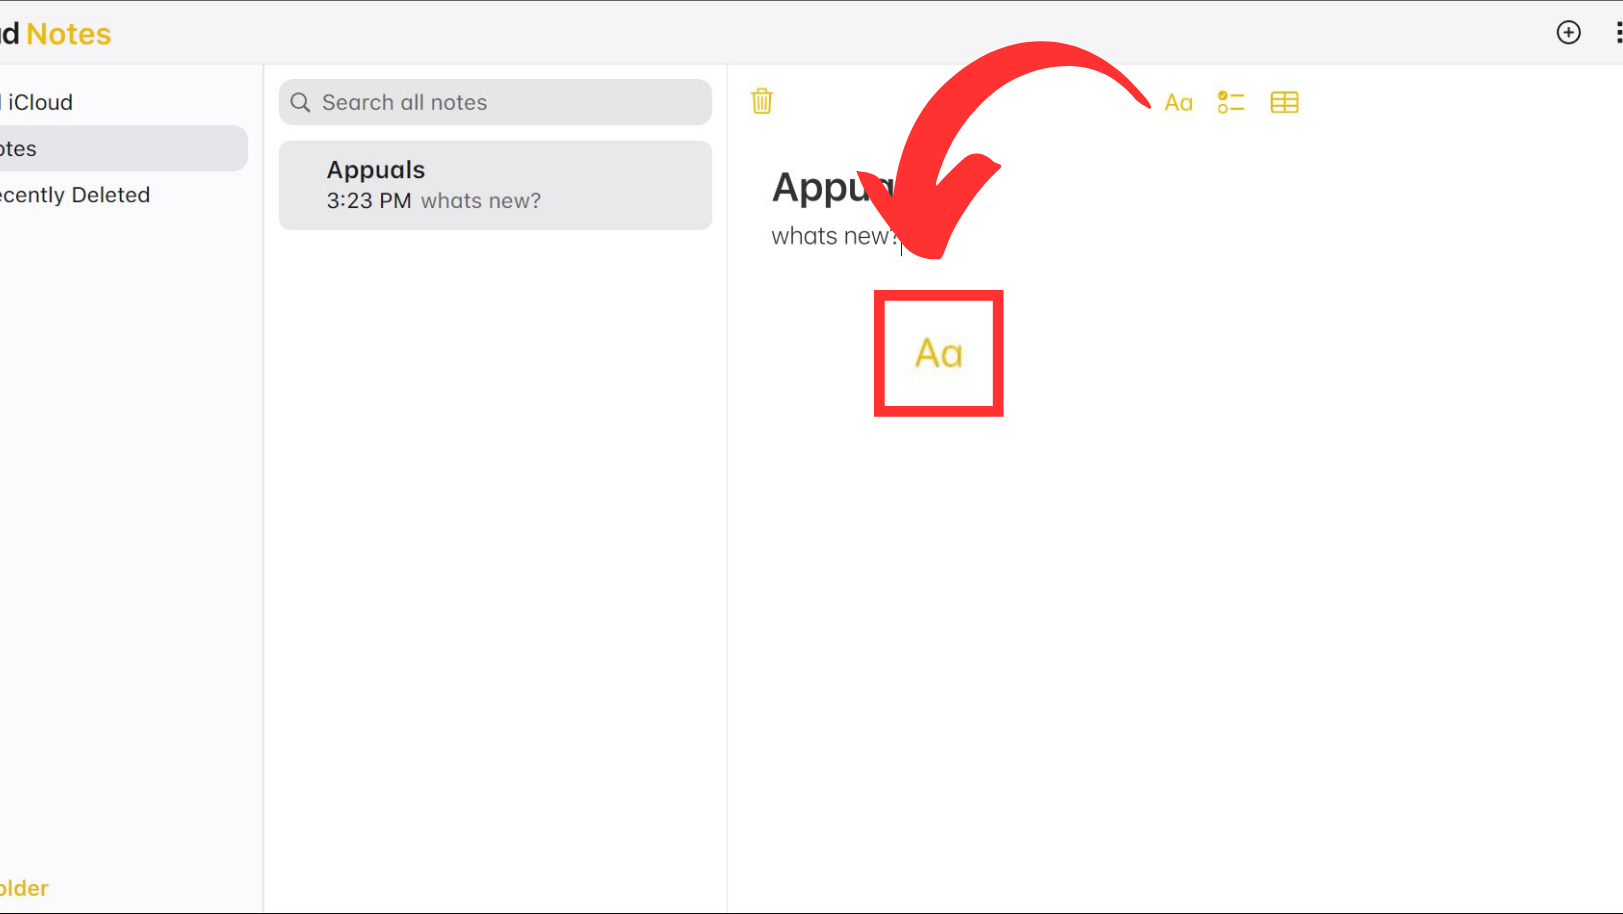 Klicken Sie auf die Schaltfläche
Anhänge können zu Notizen hinzugefügt werden, indem Sie die Notizen-App auf Ihren Apple-Geräten verwenden, auf denen Sie mit derselben Apple-ID angemeldet sind. Sie können diese Anhänge in Notizen auf iCloud.com anzeigen oder herunterladen.
Schritt 3: Listen hinzufügen oder bearbeiten
Um Listen in Notizen auf iCloud.com hinzuzufügen oder zu bearbeiten, führen Sie die folgenden Schritte aus:
↪ Vorhandene Linien umwandeln hinein eine formatierte Liste:
- Wählen Sie in „Notizen“ auf iCloud.com eine Notiz aus.
- Wählen Sie die Zeilen aus, die in eine Liste umgewandelt werden sollen.
- Klicken Sie nun in der Notizen-Symbolleiste auf die Schaltfläche „Stil auswählen“ und wählen Sie „Liste mit Aufzählungszeichen“, „Gestrichelte Liste“ oder „Nummerierte Liste“.
 Wählen Sie einen Listenstil
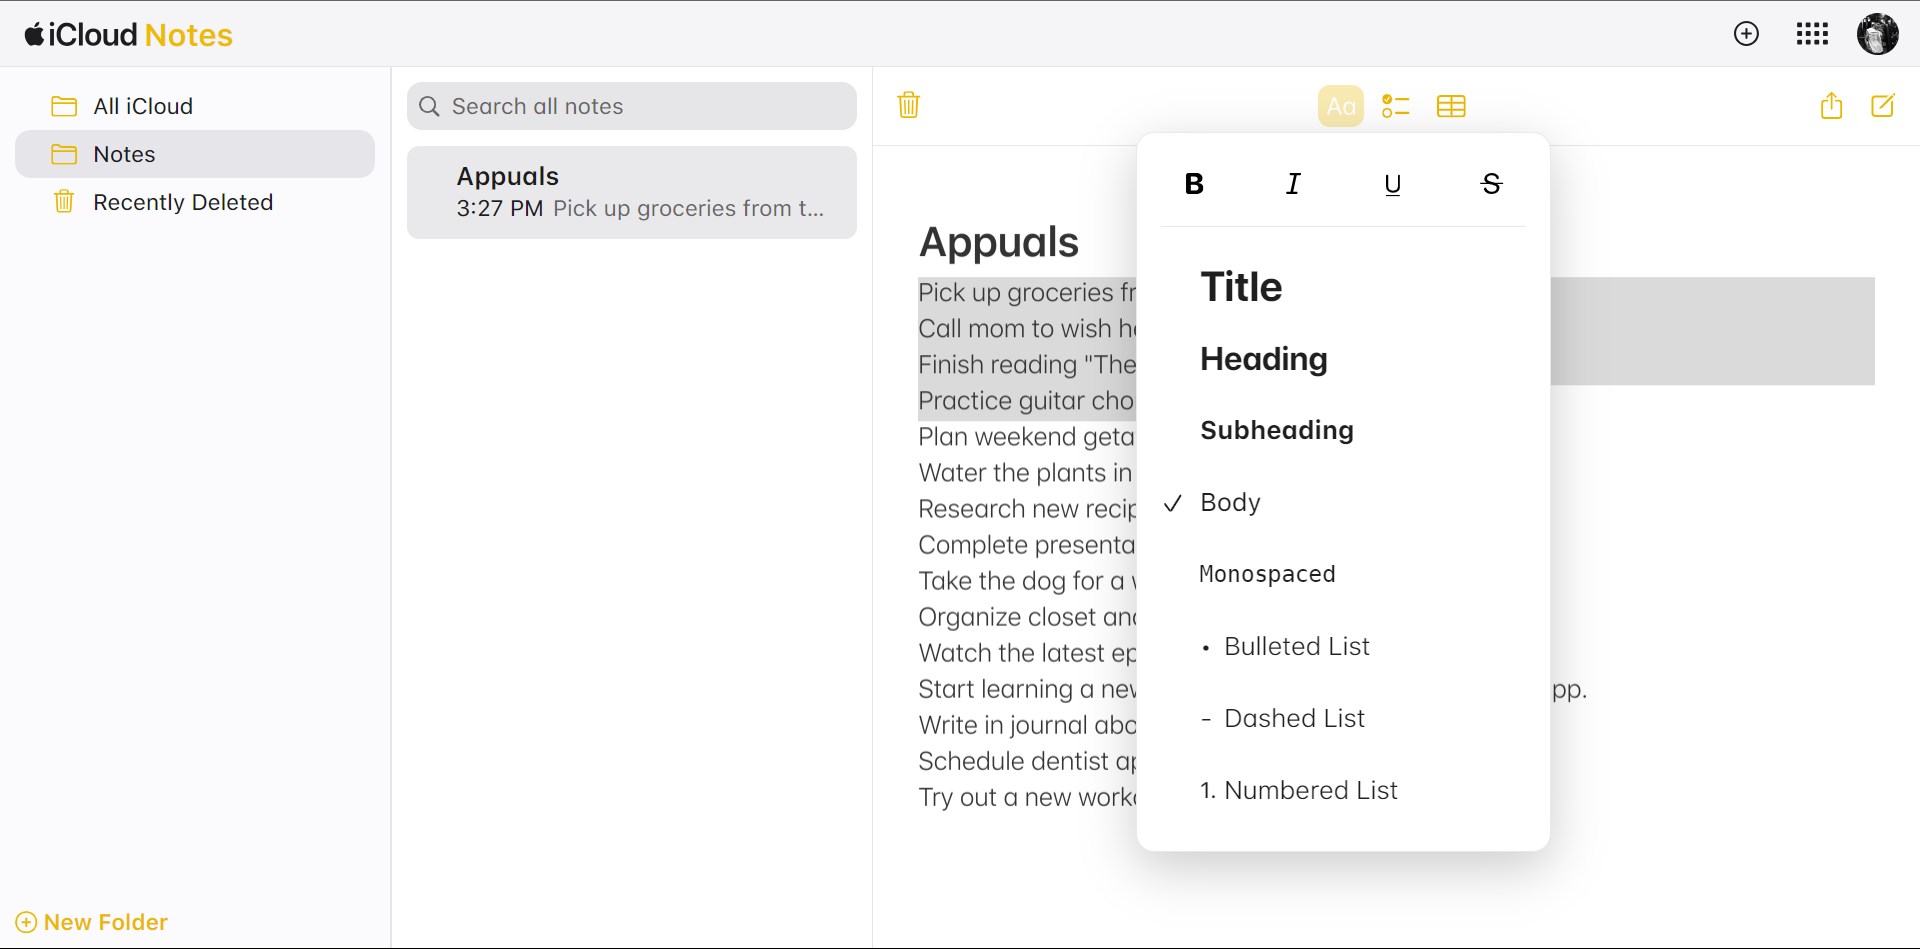 Wählen Sie einen Listenstil
↪ Erstellen Sie eine Checkliste:
- Wählen Sie in „Notizen“ auf iCloud.com eine Notiz aus.
- Führen Sie einen der folgenden Schritte aus:
- Klicken Sie auf eine leere Zeile und dann auf die Schaltfläche „Checkliste erstellen“ in der Notizen-Symbolleiste.
- Wählen Sie die Zeilen aus und klicken Sie in der Notizen-Symbolleiste auf die Schaltfläche „Checkliste erstellen“.Klicken Sie auf die Schaltfläche Checkliste
- Um eine Aufgabe als erledigt zu markieren, klicken Sie auf den leeren Kreis neben der Aufgabe.Überprüfen Sie die Kreise der erledigten Aufgaben
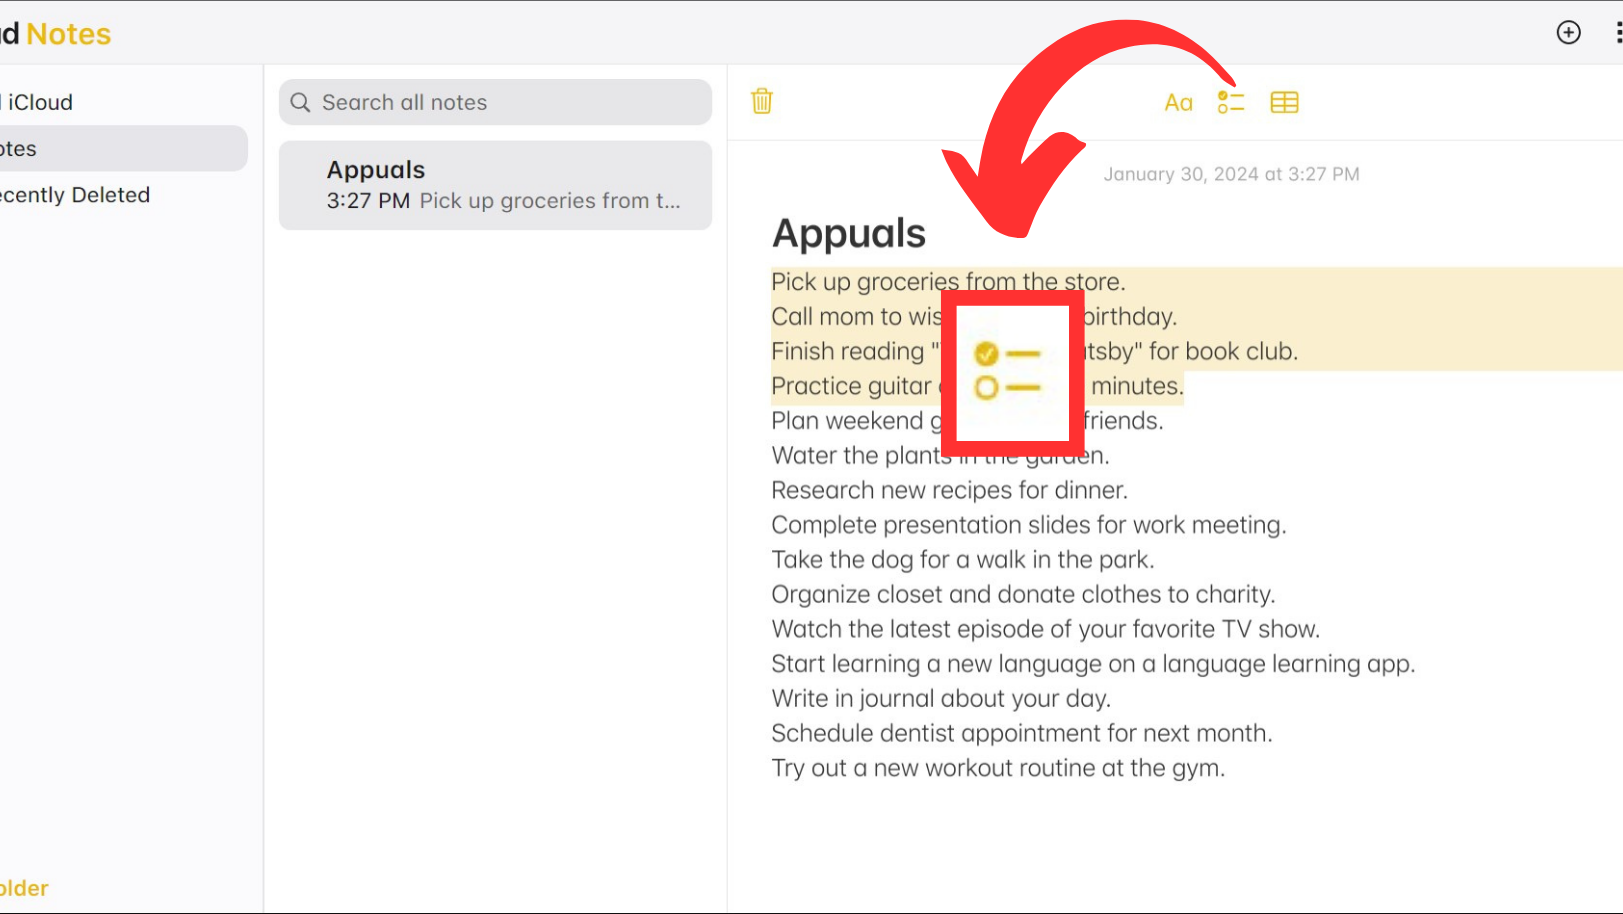 Klicken Sie auf die Schaltfläche Checkliste
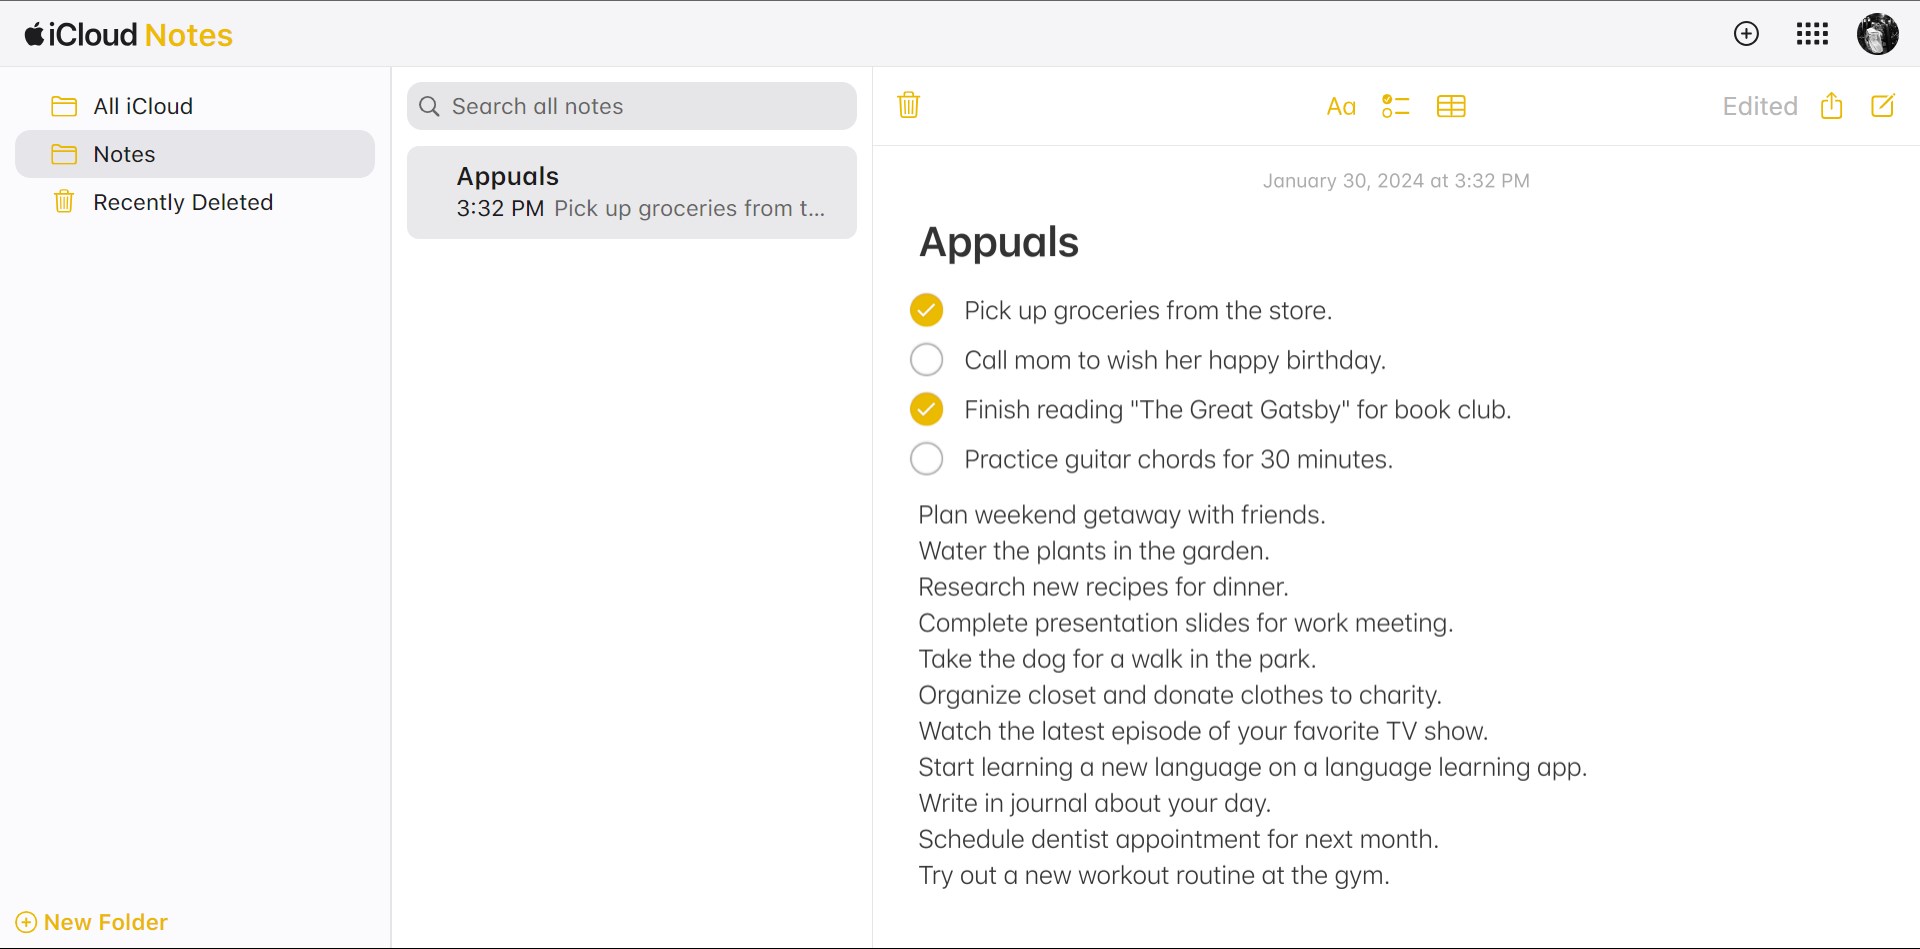 Überprüfen Sie die Kreise der erledigten Aufgaben
↪ Ein neues Listenelement hinzufügen oder eine Liste beenden:
- Wählen Sie in „Notizen“ auf iCloud.com eine Notiz aus, die eine Liste enthält.
- Führen Sie einen der folgenden Schritte aus:
- Klicken Sie auf eine beliebige Stelle in einer Liste und drücken Sie dann die Eingabetaste oder die Eingabetaste.
- Klicken Sie auf das Ende des letzten Listenelements und drücken Sie dann zweimal die Eingabetaste oder die Eingabetaste.
↪ Listenebene erhöhen oder verringern:
- Wählen Sie in „Notizen“ auf iCloud.com eine Notiz aus, die eine Liste enthält.
- Implementieren Sie nun eine der folgenden Methoden:
- Listenebene erhöhen: Klicken Sie auf den Anfang eines Listenelements und drücken Sie dann die Tabulatortaste. Alternativ drücken Sie Befehl-](auf dem Mac) oder Strg-](auf Windows).
- Listenebene verringern: Klicken Sie auf den Anfang eines Listenelements und drücken Sie dann Umschalt-Tab. Alternativ können Sie auch die Befehlstaste drücken.[ (on Mac) or Control-[ (on Windows).
READ MORE: How to Delete A Teamspace in Notion: Step-by-Step Pictures ➜
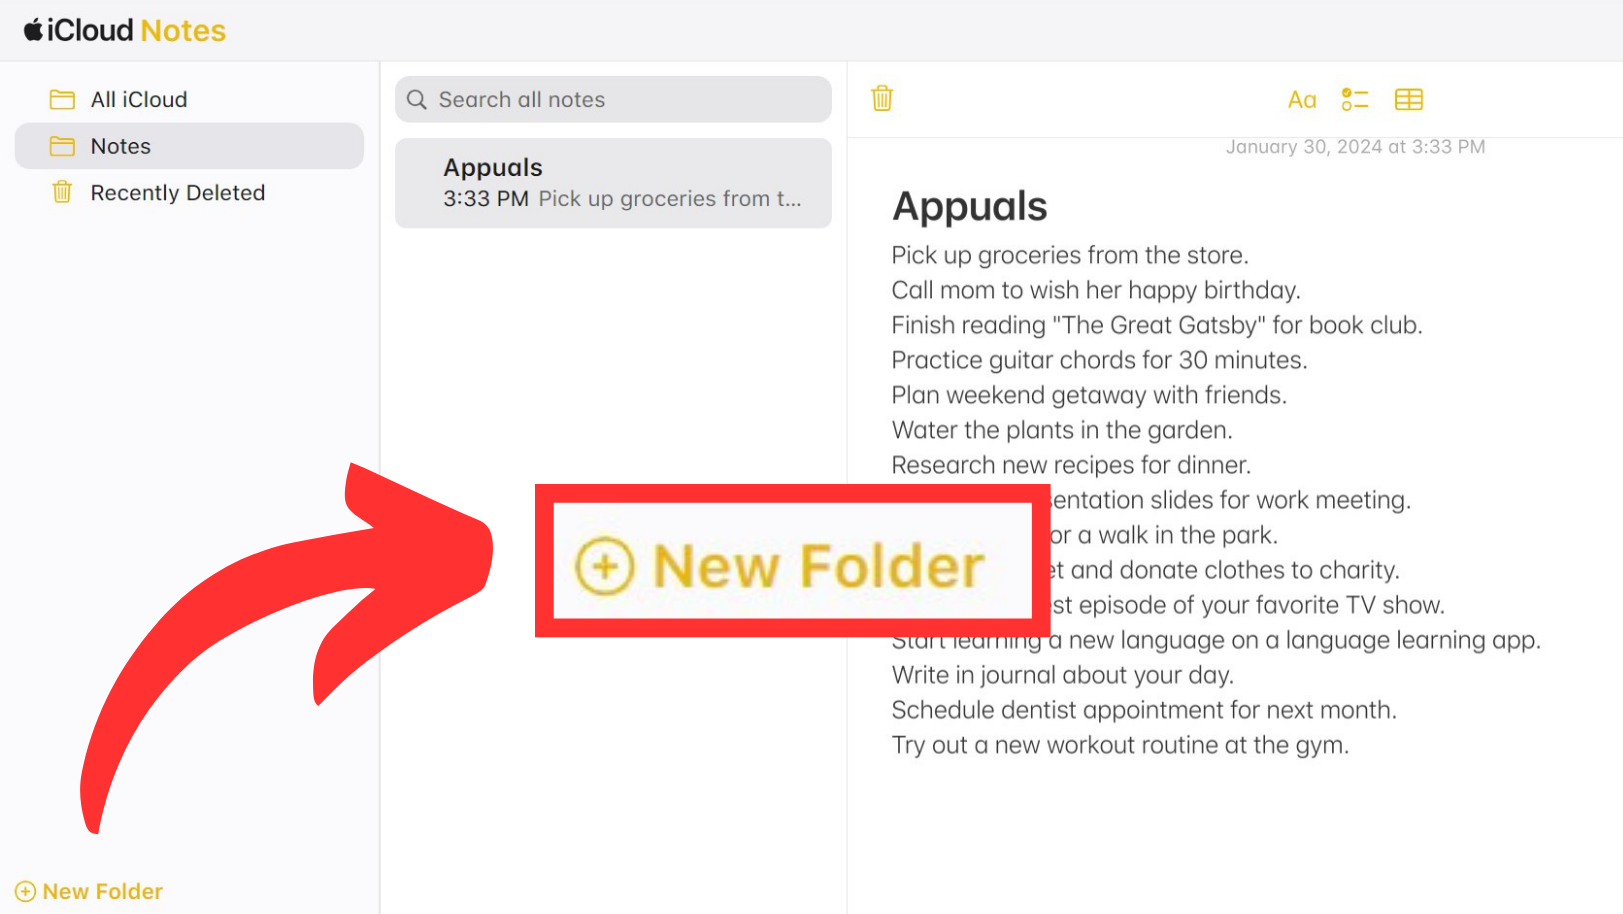
Step 4: Organize Notes in Folders
You can organize your notes in iCloud.com by creating folders. Here’s how:
↪ Create a Folder:
- Click “New Folder” at the bottom of the folder list.Click on New Folder
- Name the folder and press Return or Enter.Name the folder
- Your folder will appear alphabetically in the folder list.
 Click on New Folder
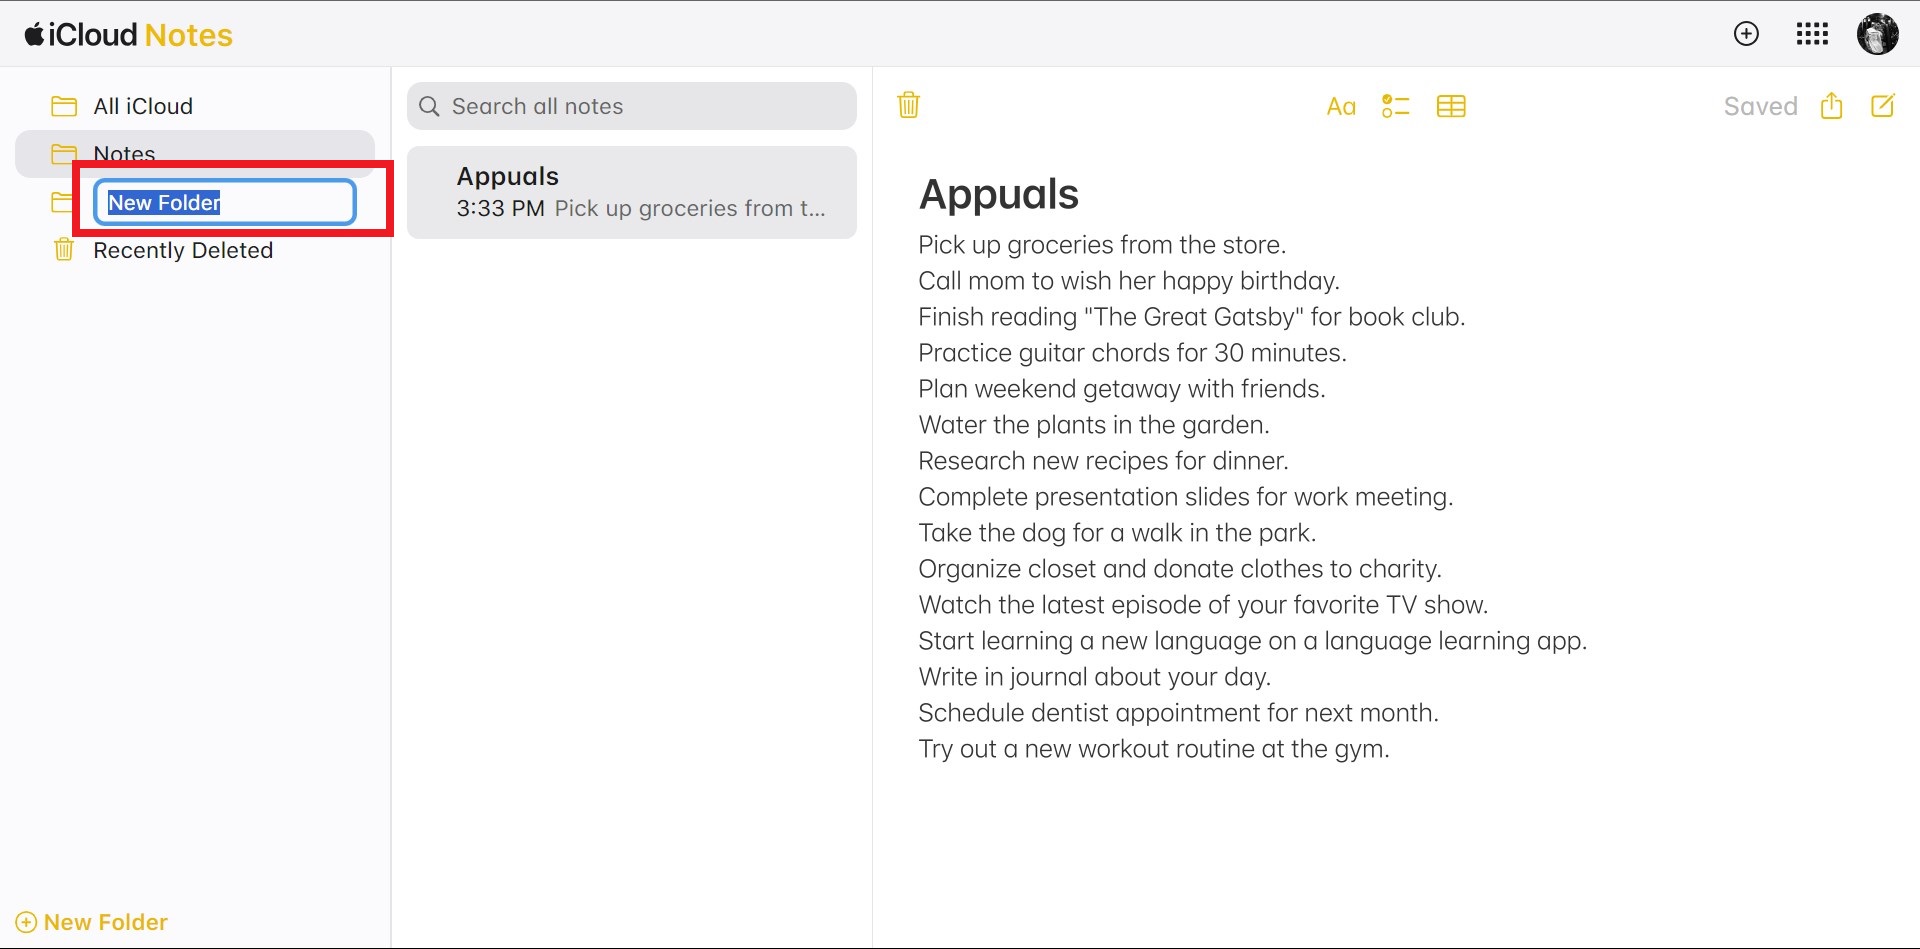 Name the folder
↪ Rename or Move a Folder:
- To rename a folder: Hover over the folder, click the More button, select “Rename Folder,” enter a new name, and press Return or Enter.Choose Rename folder
- To place a folder inside another: Drag and drop it onto the desired folder.
- To move a subfolder to the top level: Drag and drop it into the “All iCloud” folder.
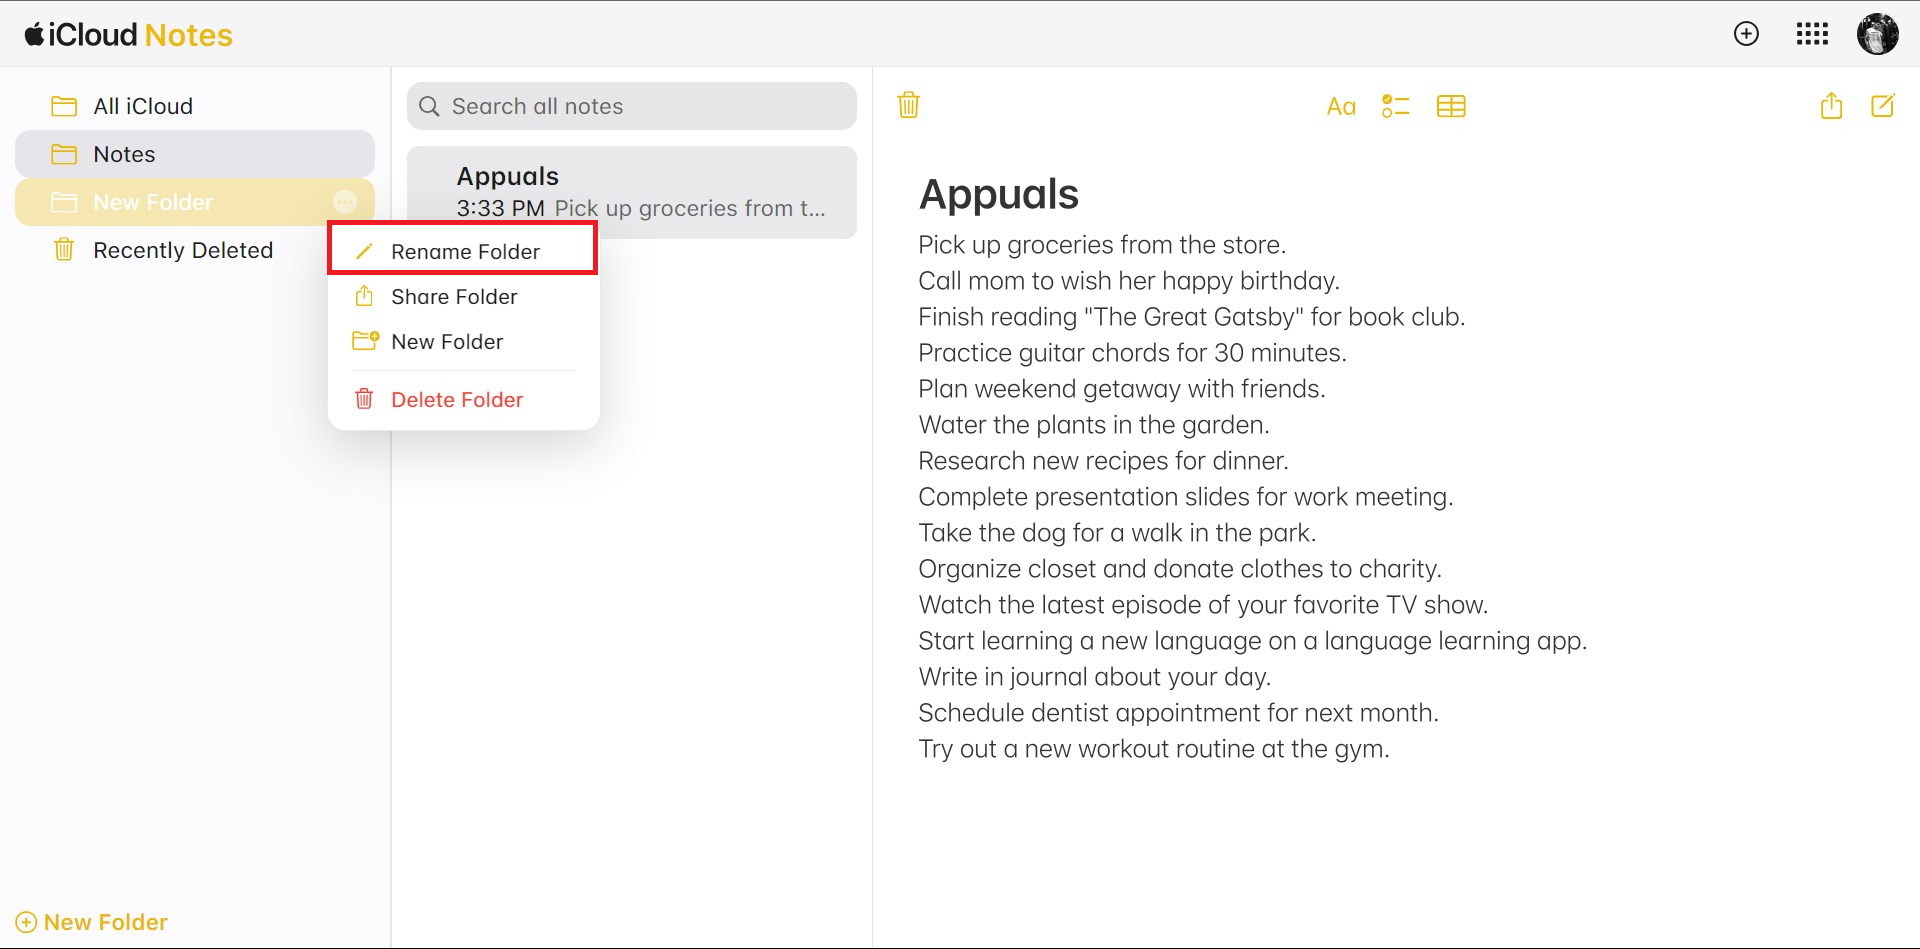 Choose Rename folder
↪ Delete a Folder:
- Hover over the folder you want to delete and click the More button.
- Select “Delete Folder.”Select Delete Folder
- Deleted folders and their notes move to the “Recently Deleted” folder for 30 days before permanent removal.
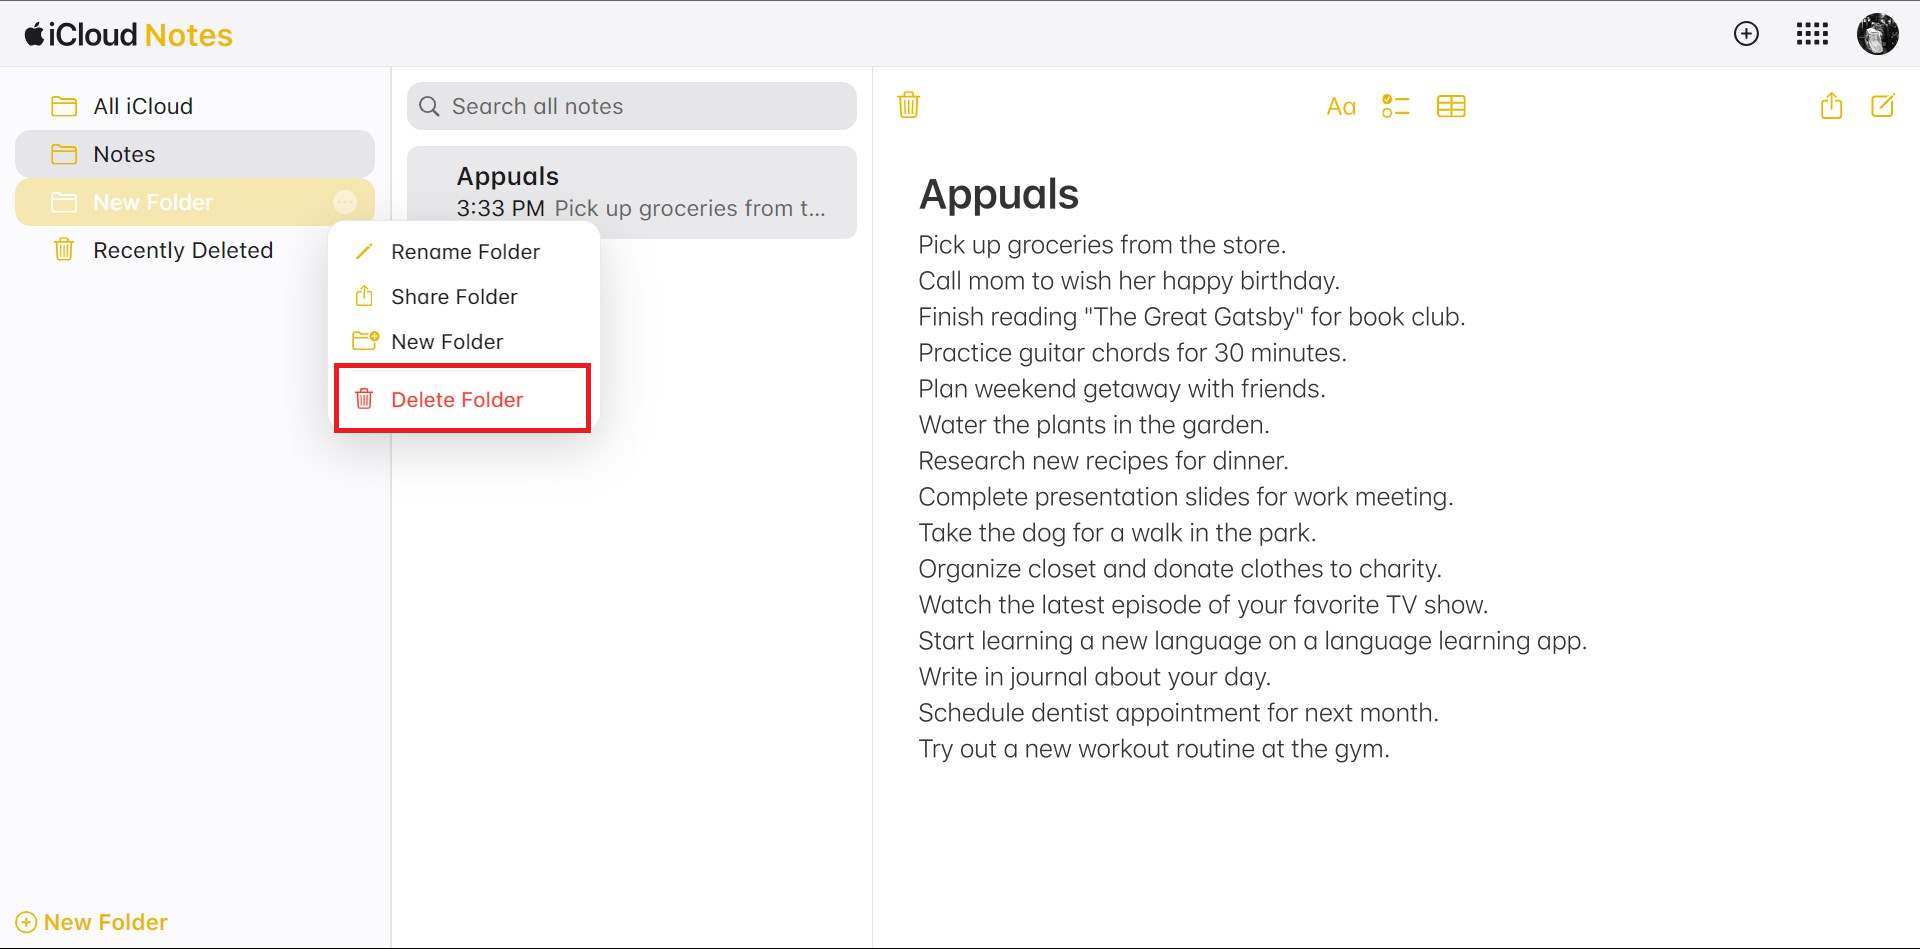 Select Delete Folder
↪ Move a Note to Another Folder:
- Drag the note to the desired folder. Notes are listed by last modified date. Note sharing permissions align with the folder’s permissions.
- You cannot move notes to the “All iCloud” folder.
Step 5: View Notes and Locked Notes on iCloud.com
When you sync Notes with iCloud, your notes stay updated across iCloud.com and all devices where Notes is enabled in iCloud settings.
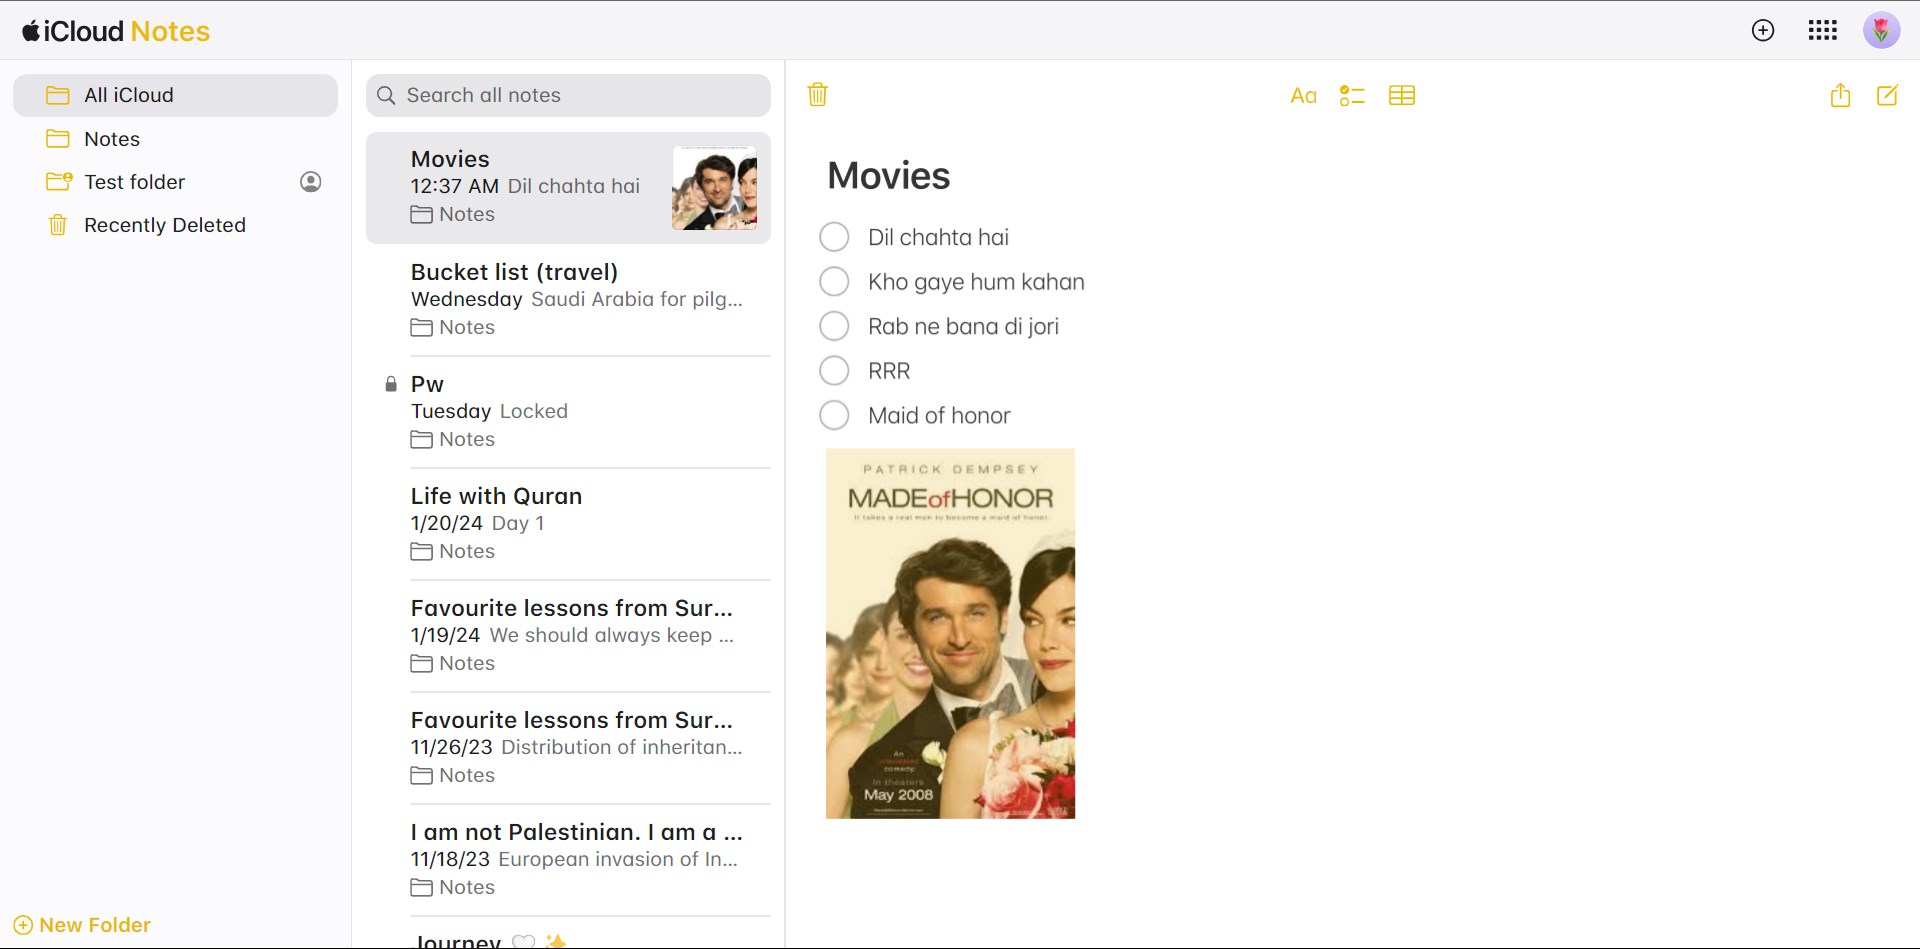
↪ Viewing a Note:
- In Notes on iCloud.com, select the desired note from the list.
 View Notes
 View Notes
- If needed, switch to a different folder to locate the note.
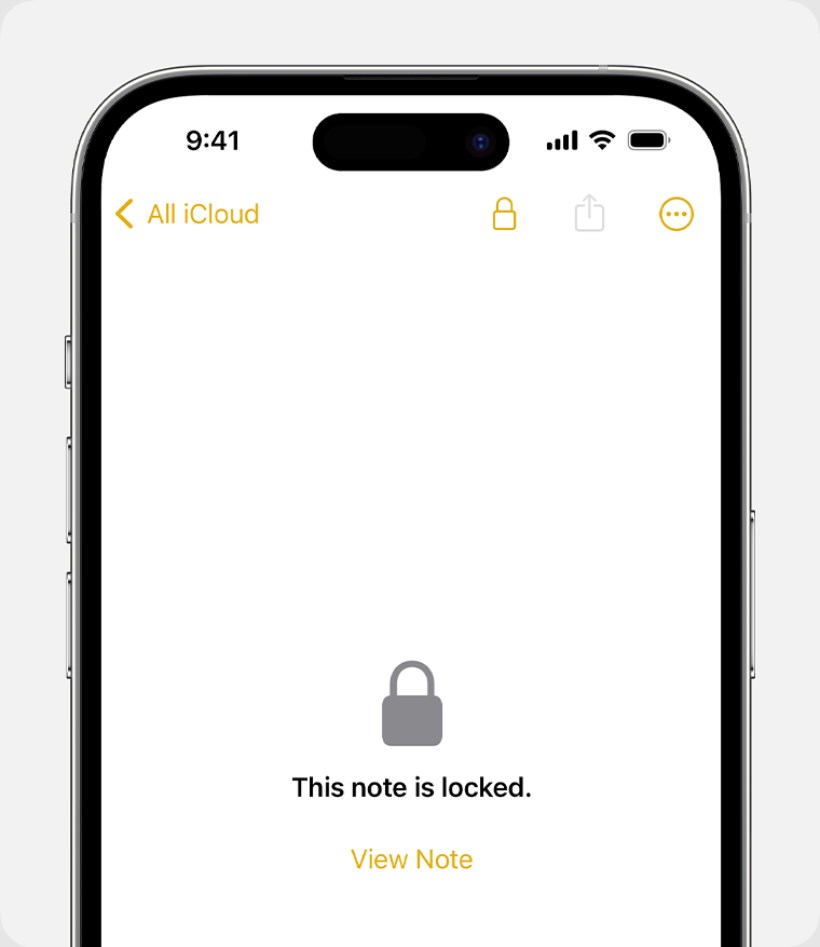
↪ Viewing and Closing Locked Notes:
 Locked note
You can access notes you’ve locked on an iPhone, iPad, iPod touch, or Mac signed in with the same Apple ID. To view locked notes on iCloud.com:
- Select a locked note from the list and enter the password you set for locked notes.
- Once you enter the password for one locked note, you can access other locked notes without re-entering the password. Notes are re-locked after inactivity or upon closing the browser.
- To close locked notes, click the Lock button in the Notes toolbar.
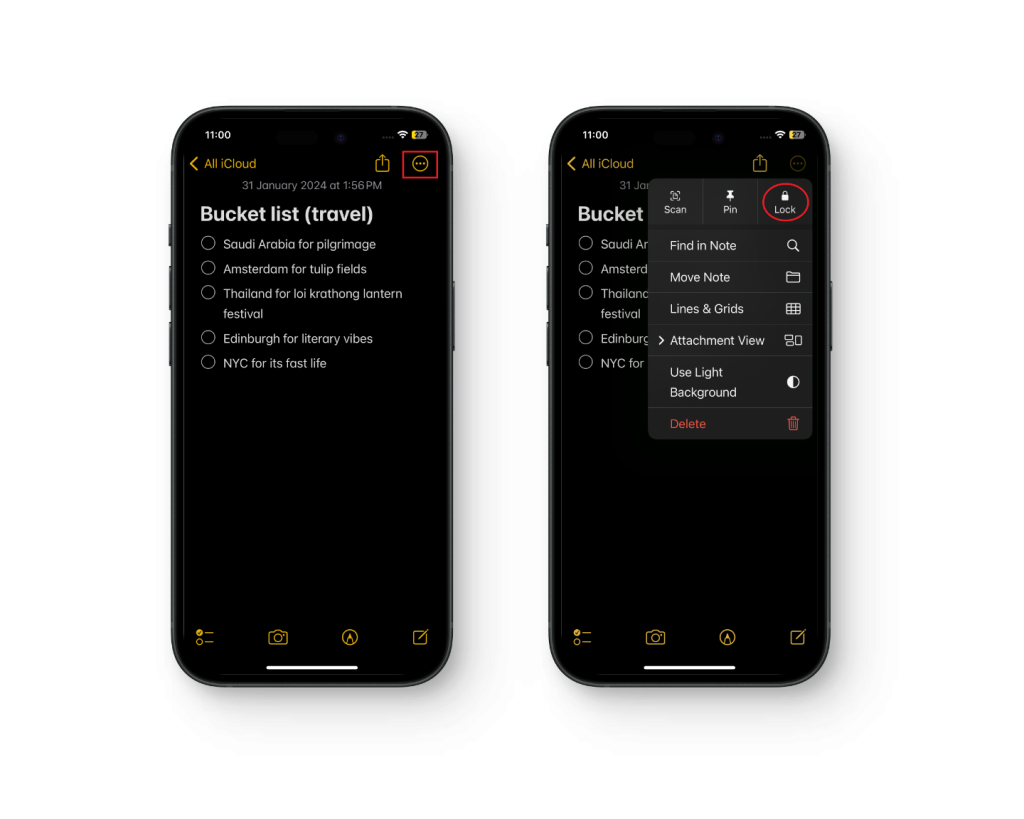
↪ Note Locking:
- To lock, unlock, change the password, or reset the password for locked notes, utilize the Notes app on your iPhone, iPad, iPod touch, or Mac.
 Tap on More > Lock to lock a note
 - Also, keep in mind if you’ve locked your notes with your device’s passcode or login password, you cannot access them on iCloud.com.
 Tap on More > Lock to lock a note
READ MORE: Setup your iPhone and Mac to Unlock with Apple Watch ➜
Step 6: View or Download Attachments
You can attach various items to your notes using the Notes app on your Apple devices signed in with the same Apple ID. Here’s how you can view and download these attachments in Notes on iCloud.com:
Placeholder images appear for attachments in locked notes on iCloud.com. To access attachments in locked notes, use the Notes app on your device with the same Apple ID.
i. View Photos, Audio Files, Maps, and More:
- In Notes on iCloud.com, select the note containing the attachment you wish to view or play.
- Double-click the attachment.Double-clicking the attachment will highlight it yellow
- The attachment is either downloaded to your computer, opened in the appropriate application, or both.
 Double-clicking the attachment will highlight it yellow
ii. Viewing and Downloading Scanned Documents:
- Select the note containing the scanned document.
- To view the document, double-click its thumbnail.
- To download the document, double-click its thumbnail and then click the download button.
- For multiple documents, click their thumbnails in the Scanned Documents window.
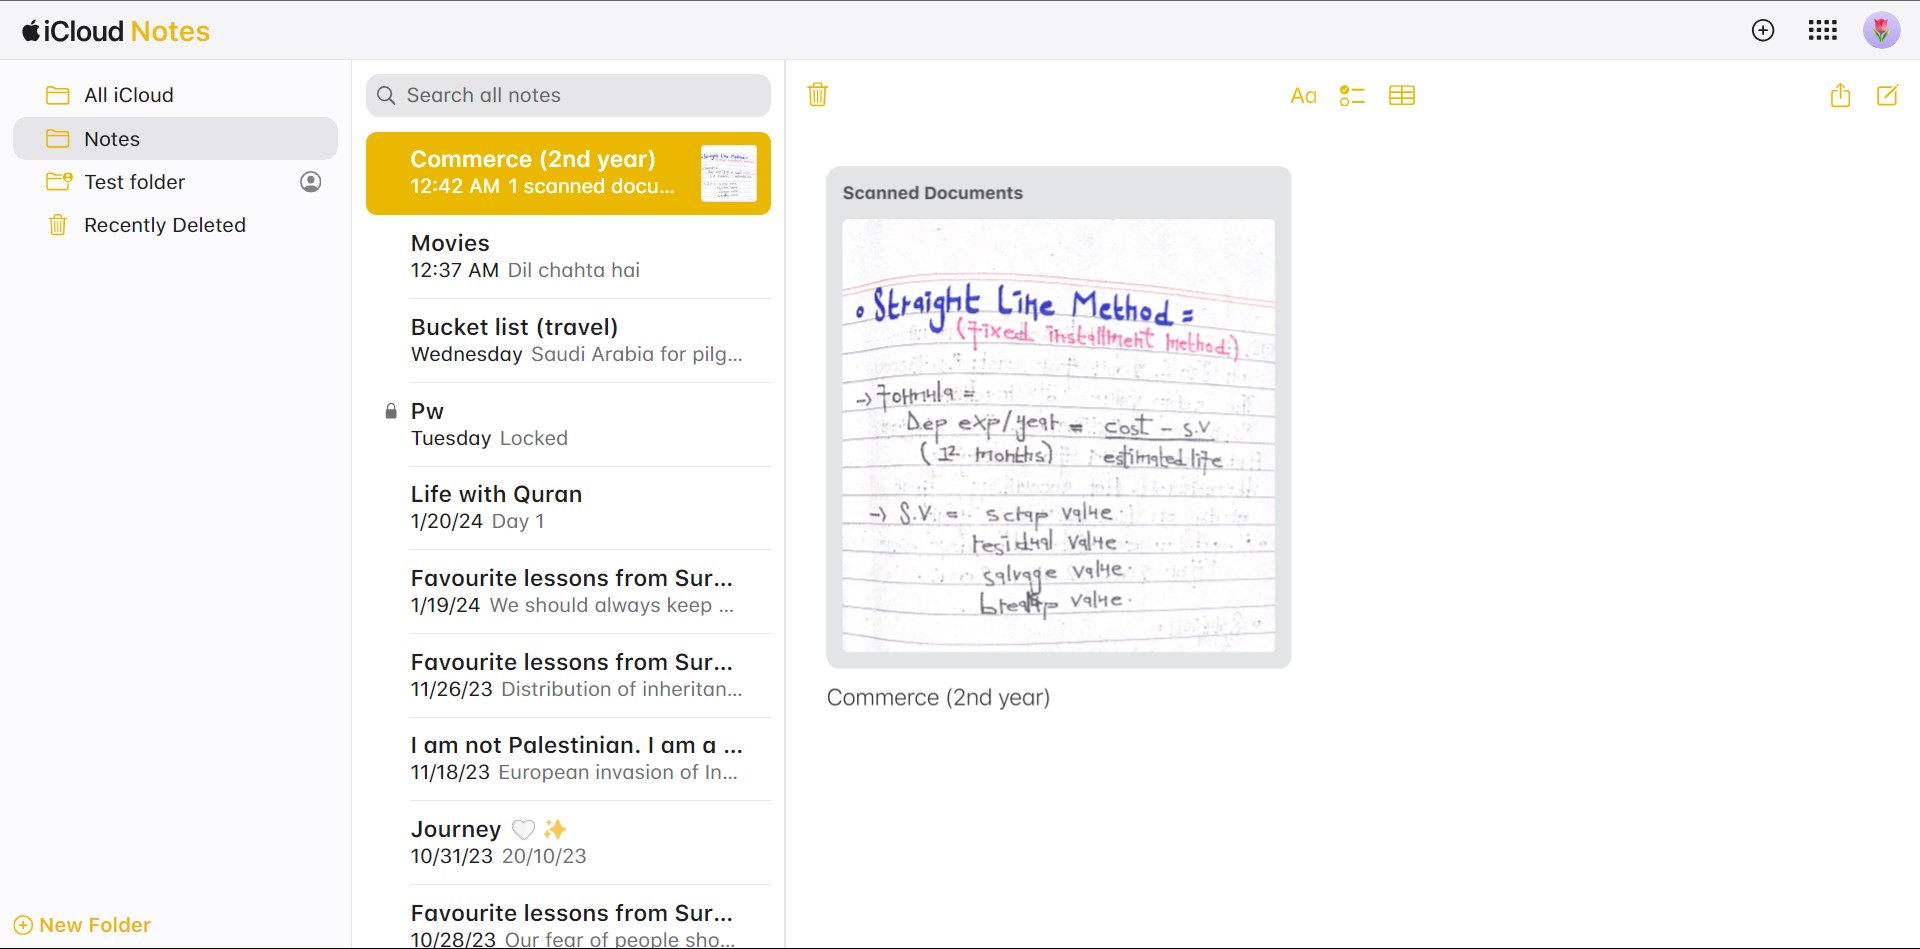 Note with a scanned document
iii. View and Edit iWork Documents:
- Choose the note containing the Pages, Numbers, or Keynote attachment.
- Double-click the attachment.
- The attachment opens in Pages for iCloud, Numbers for iCloud, or Keynote on iCloud. Any changes made only affect the copy in iCloud Drive, not the attachment in the note.
 Note with attachment
Step 7: Delete and Recover Notes
You can manage your notes effectively by deleting those you no longer need and recovering recently deleted ones within 30 days. Here’s how:
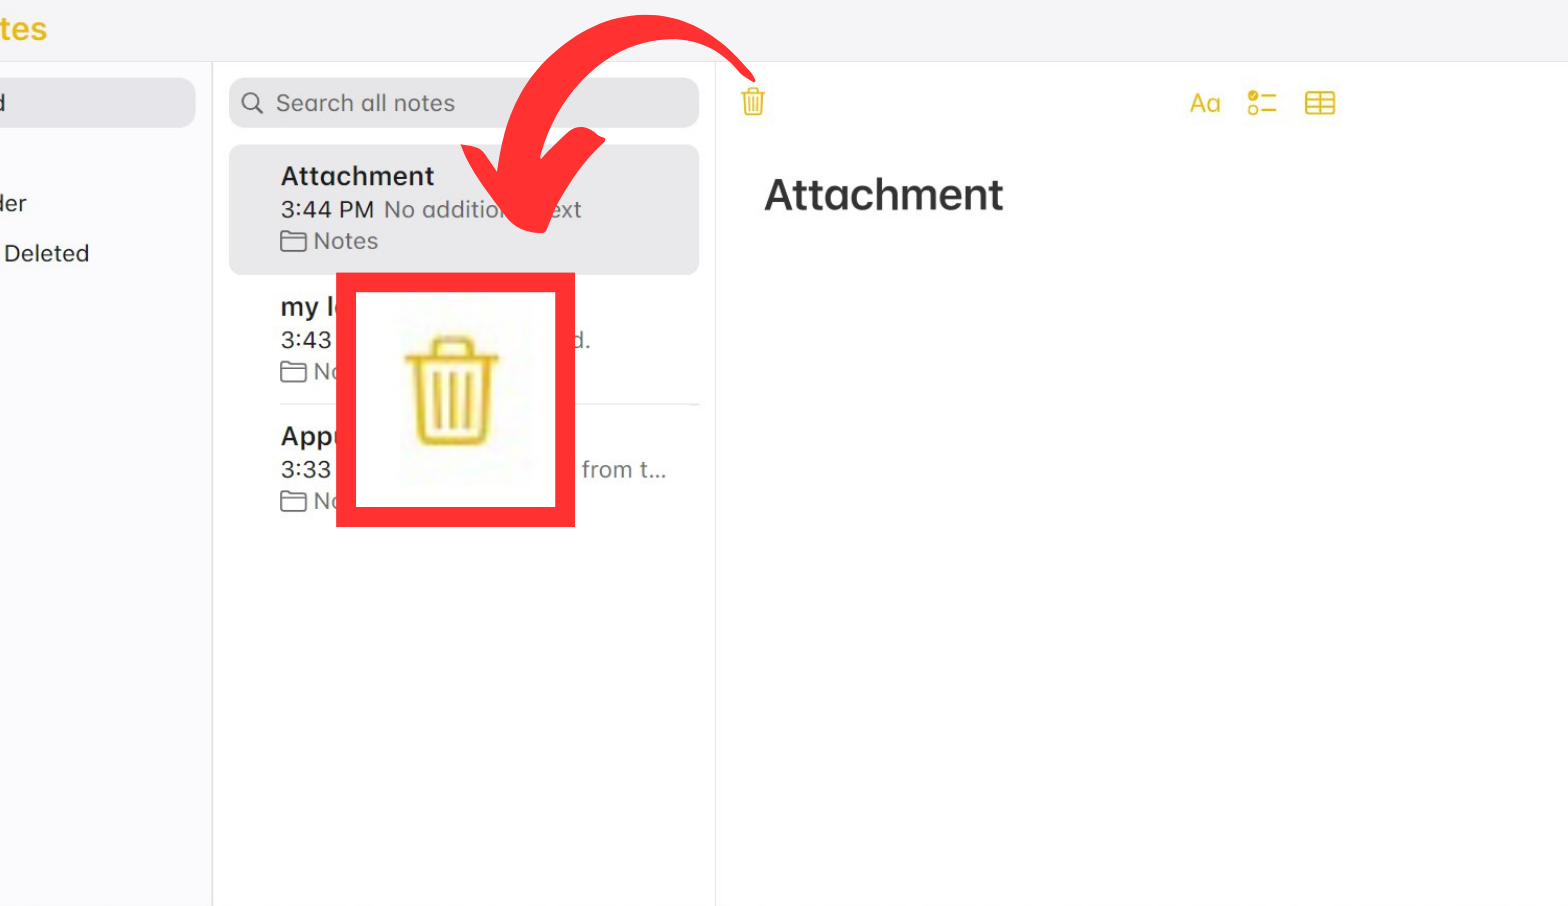
↪ Deleting a Note:
- In Notes on iCloud.com, select the note you wish to delete.
- Click the “Delete” button in the Notes toolbar.
 Click on the bin icon
 - The deleted note is moved to the Recently Deleted folder on iCloud.com, and all your devices are signed in with the same Apple ID.
 Click on the bin icon
↪ Recovering Recently Deleted Notes:
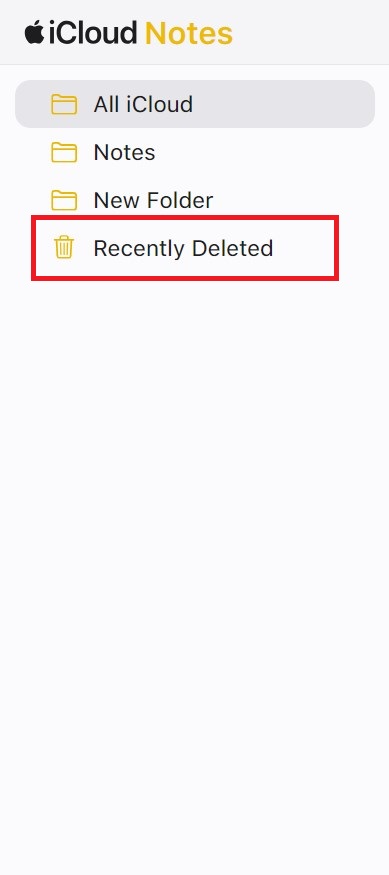
- Navigate to the “Recently Deleted” folder in the folder list on the left.
 Select Recently Deleted
 - If the folder is empty, no notes can be recovered.
- Select the desired note and click “Recover” in the Notes toolbar.
 Click on Recover
 - The note is restored to the Notes folder. Alternatively, drag the note directly to another folder.
 Select Recently Deleted
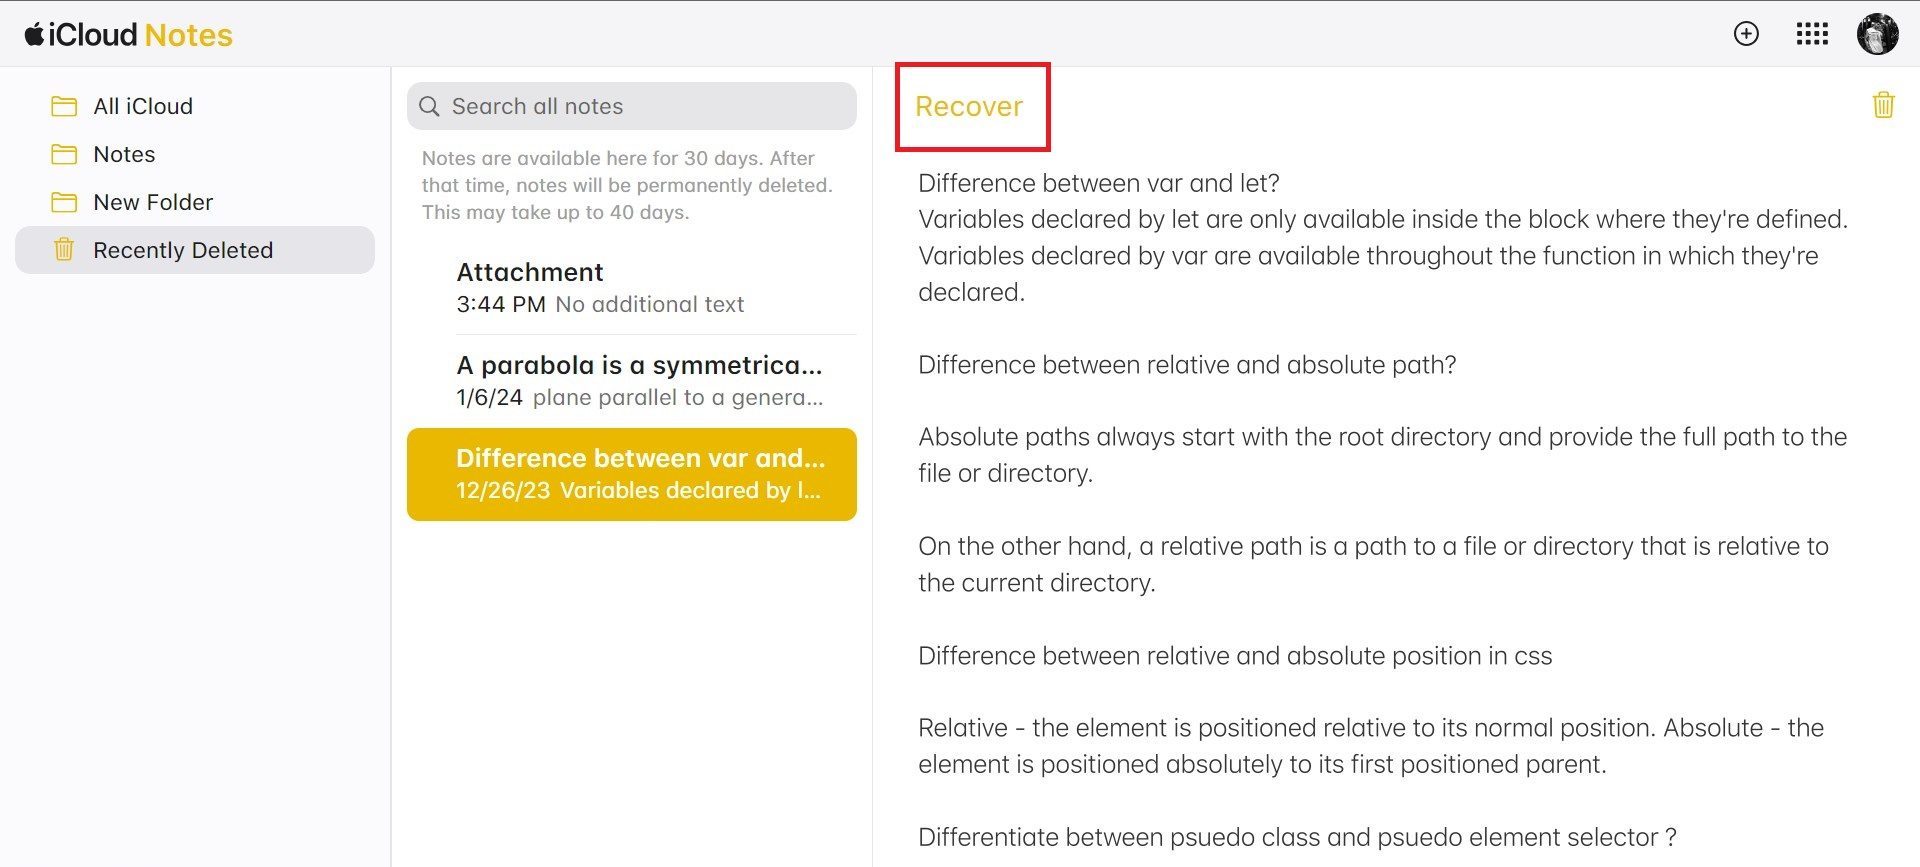 Click on Recover
↪ Permanently Removing Deleted Notes:
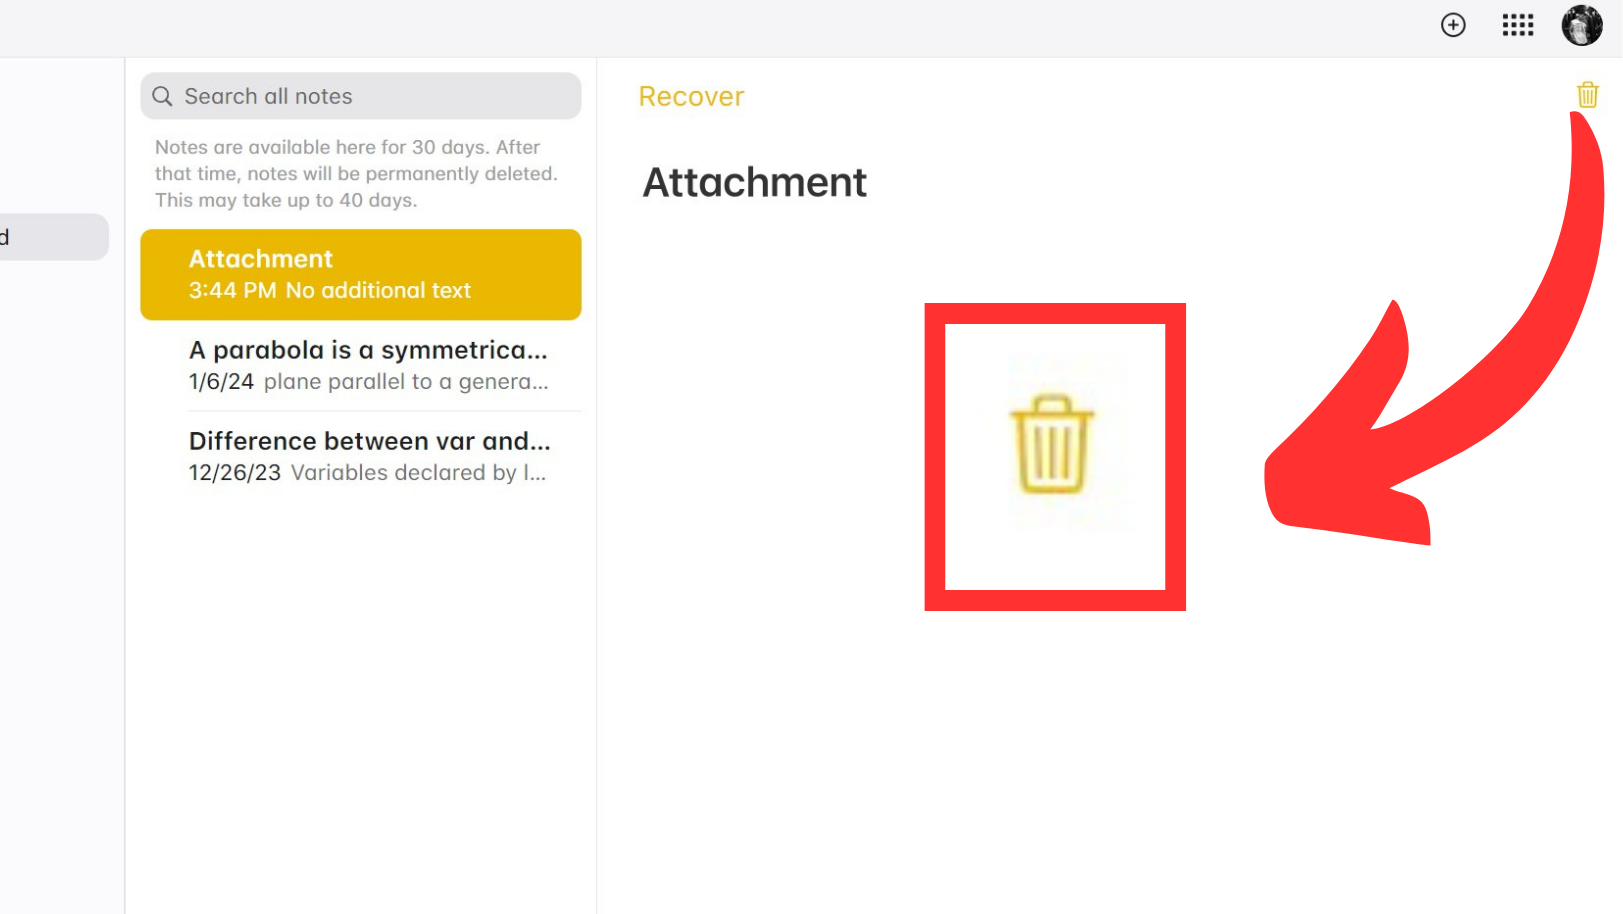
- In the “Recently Deleted” folder, select the note you want to remove permanently.
- Click the “Delete” button in the Notes toolbar.Click on the bin icon
- The selected note is immediately removed from all your devices. Notes left in the Recently Deleted folder are automatically and permanently removed after 30 days.
 Click on the bin icon
Step 8: Search Notes
All folders, excluding the Recently Deleted folder, are searched comprehensively. Locked notes are not included in the search results. To search locked notes, select one and enter your Notes password to unlock them all.
Effortlessly find the exact note you need by utilizing the search feature in Notes on iCloud.com by following these steps:
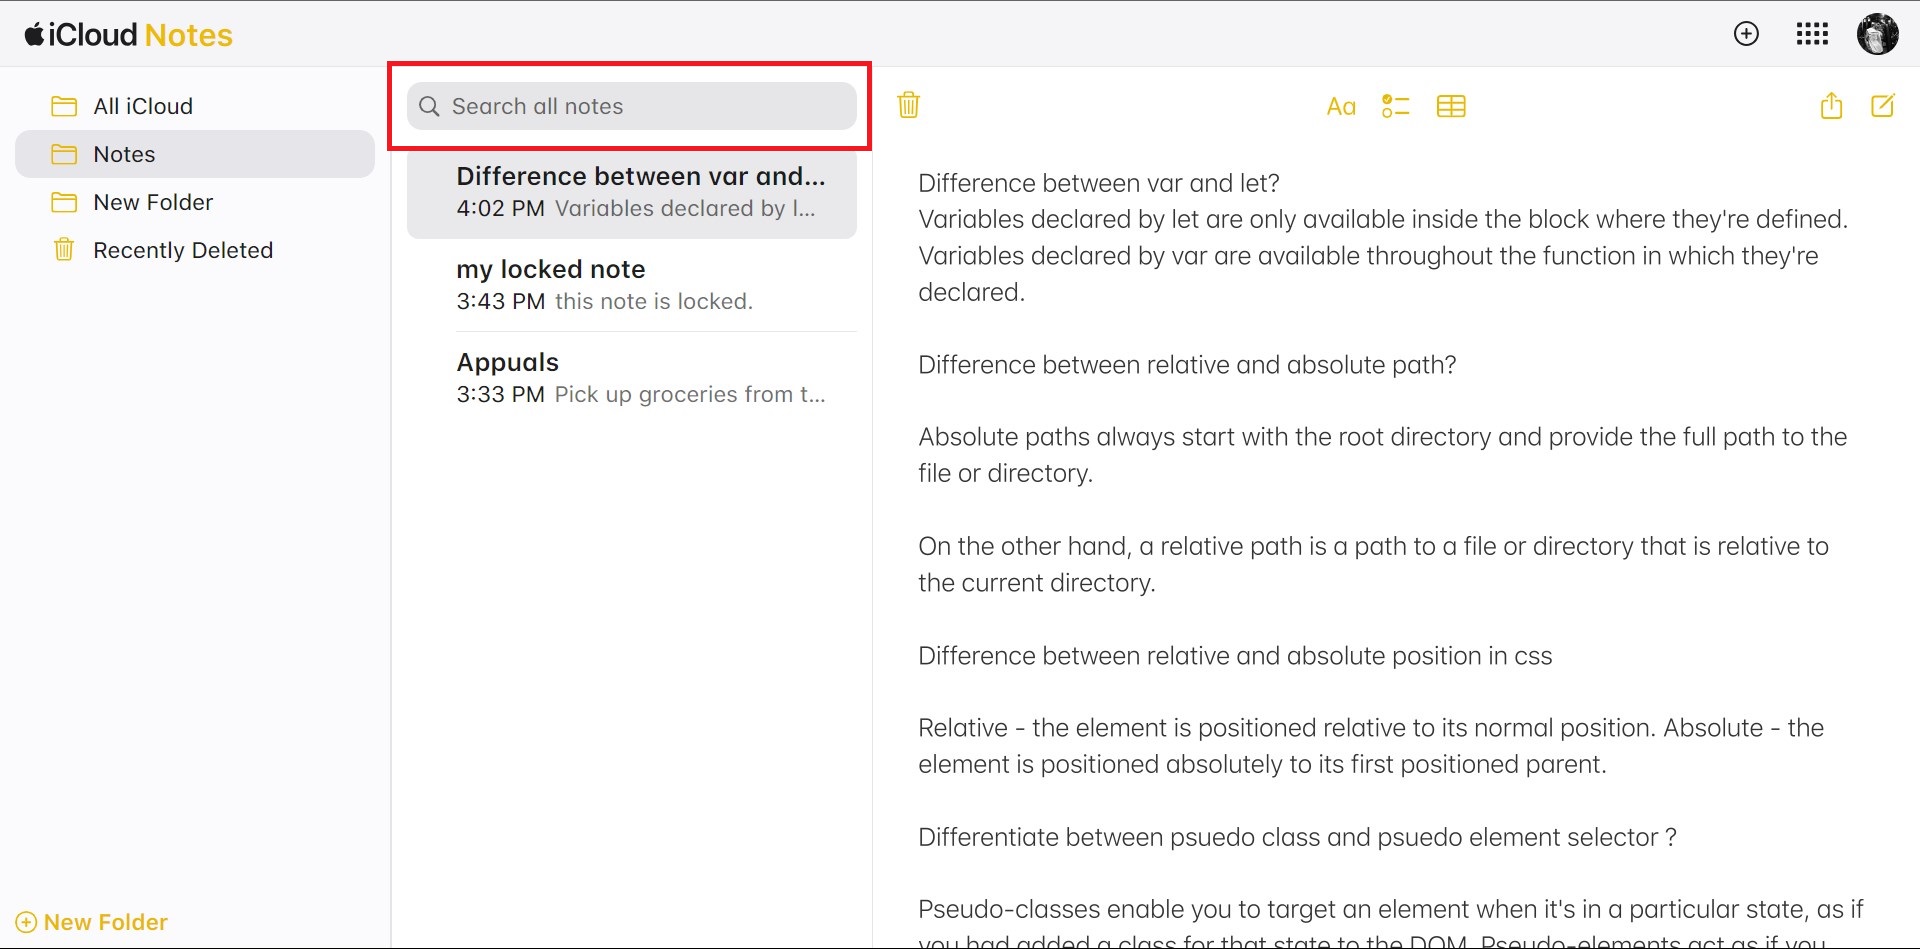
- Click the search field located at the top of the notes list.Search using this field
- Explore suggested search options to refine your search criteria efficiently.
- Type specific text, an emoji, or keywords related to your search query.
- To clear the search and return to the complete notes list, click the delete button within the search field.
 Search using this field
READ MORE: How to Recover Deleted Notes in iPhone? ➜
Step 9: Share Notes
Invite others to collaborate on your notes by sharing them on iCloud.com. Follow the below-mentioned steps to do so:
↪ Share Notes:
- Choose the note you want to share in Notes on iCloud.com.
- Click on the Share Button.Click on the Share button
- Choose Sharing Option:
- Email: Specify permission levels and recipient email addresses. Add a message if desired, then click “Send“.
- Copy Link: Copy the link and specify permission levels and recipients.Choose Share options
- Only invited individuals can view and edit the note.
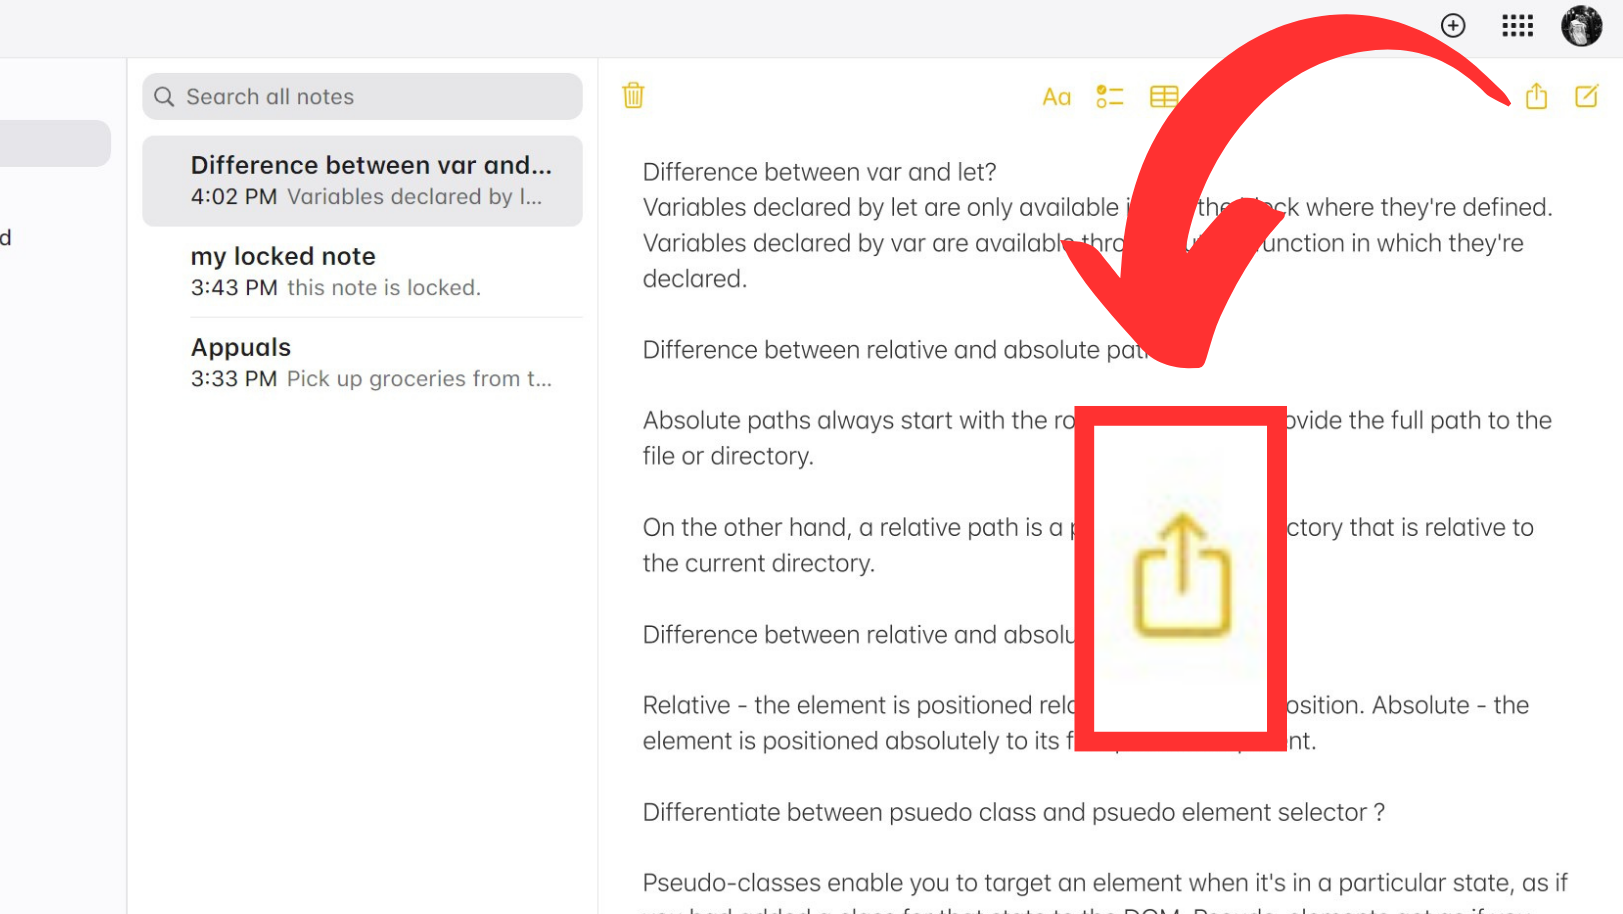 Click on the Share button
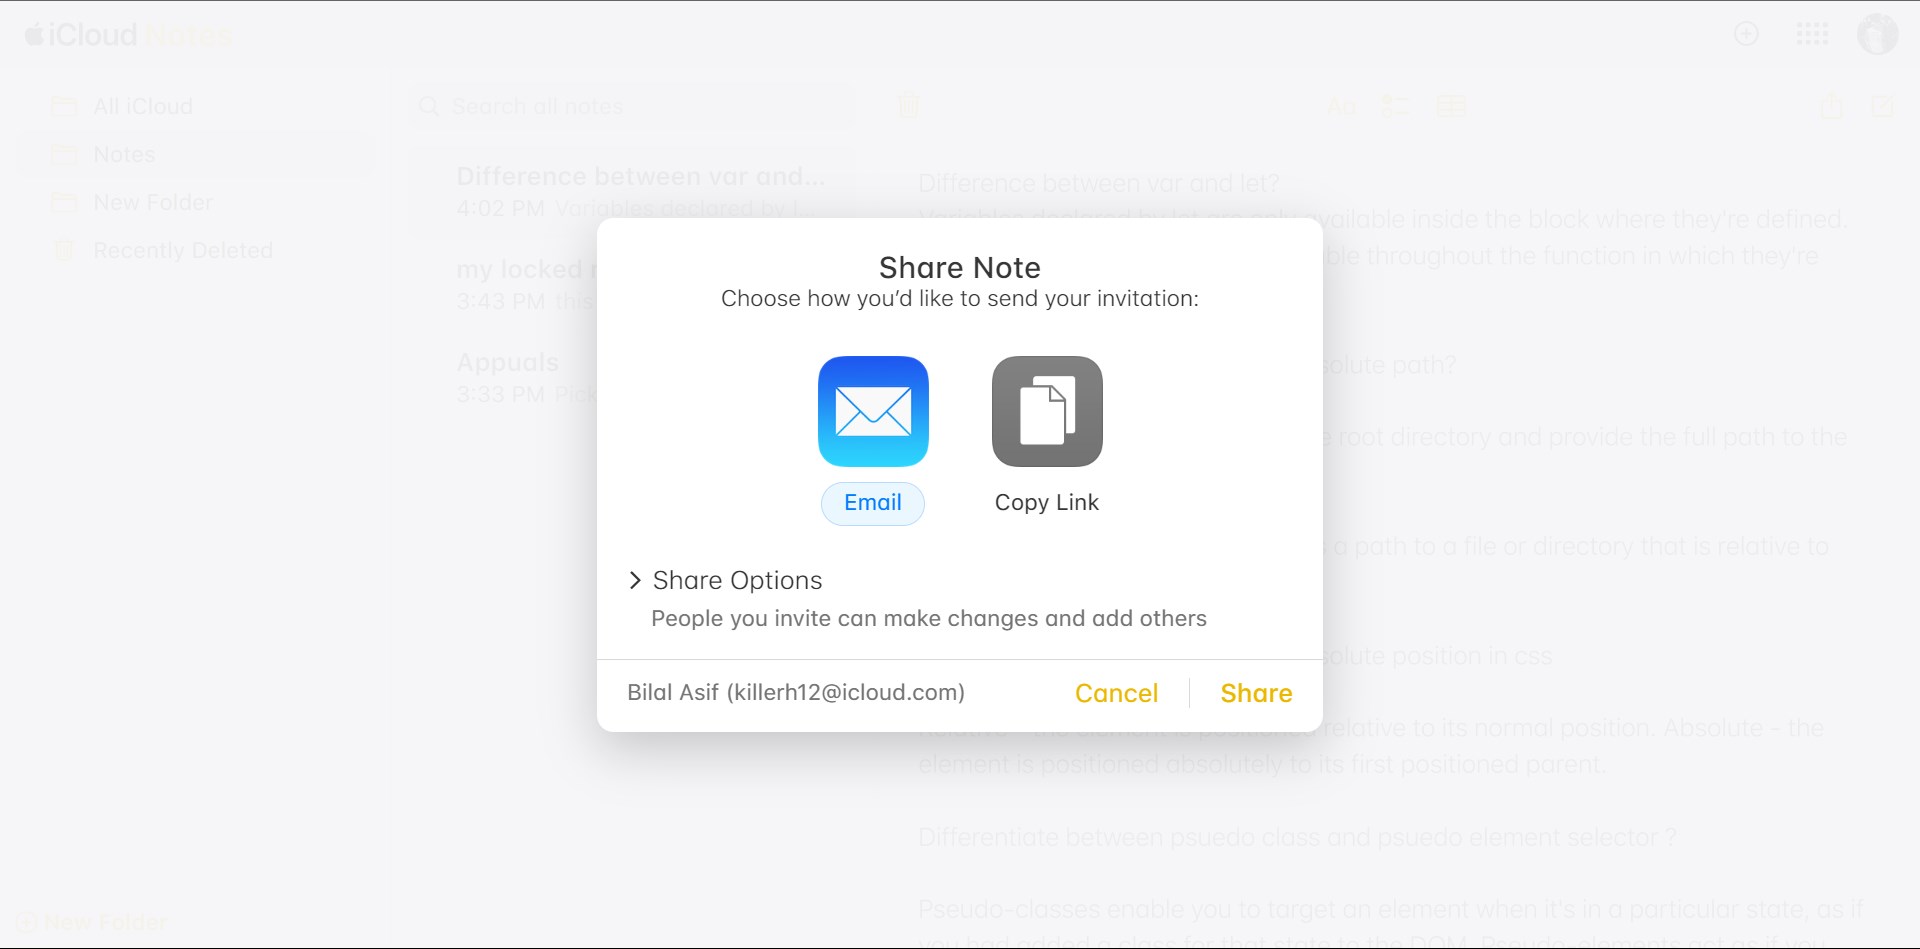 Choose Share options
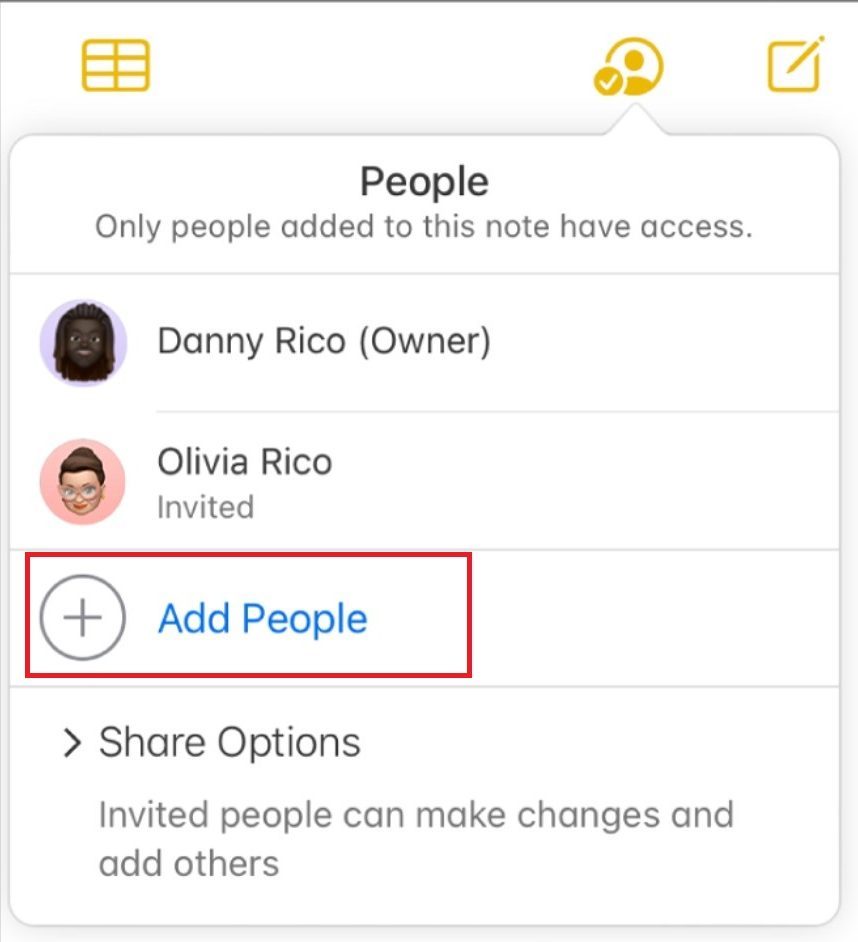
↪ Manage Participants:
- In the notes list, select the shared note.
- Click the Participant Icon.
- To Manage Participants:
- Add Participants: Click “Add People” at the bottom of the participants list.
 Select Add People
 - Manage Permissions: Adjust permissions by hovering over a participant’s name, clicking the More button, and selecting the desired option.
- Remove Participants: Hover over a participant’s name, click the More button, and choose “Stop Sharing.”
 Select Stop Sharing
- Add Participants: Click “Add People” at the bottom of the participants list.
 Select Add People
 Select Stop Sharing
↪ Remove Yourself from a Shared Note:
- Choose the note you want to remove yourself from.
- Click the Participant Icon.
- Hover over your name, click the More button, and select “Remove Me.“Click on Remove me
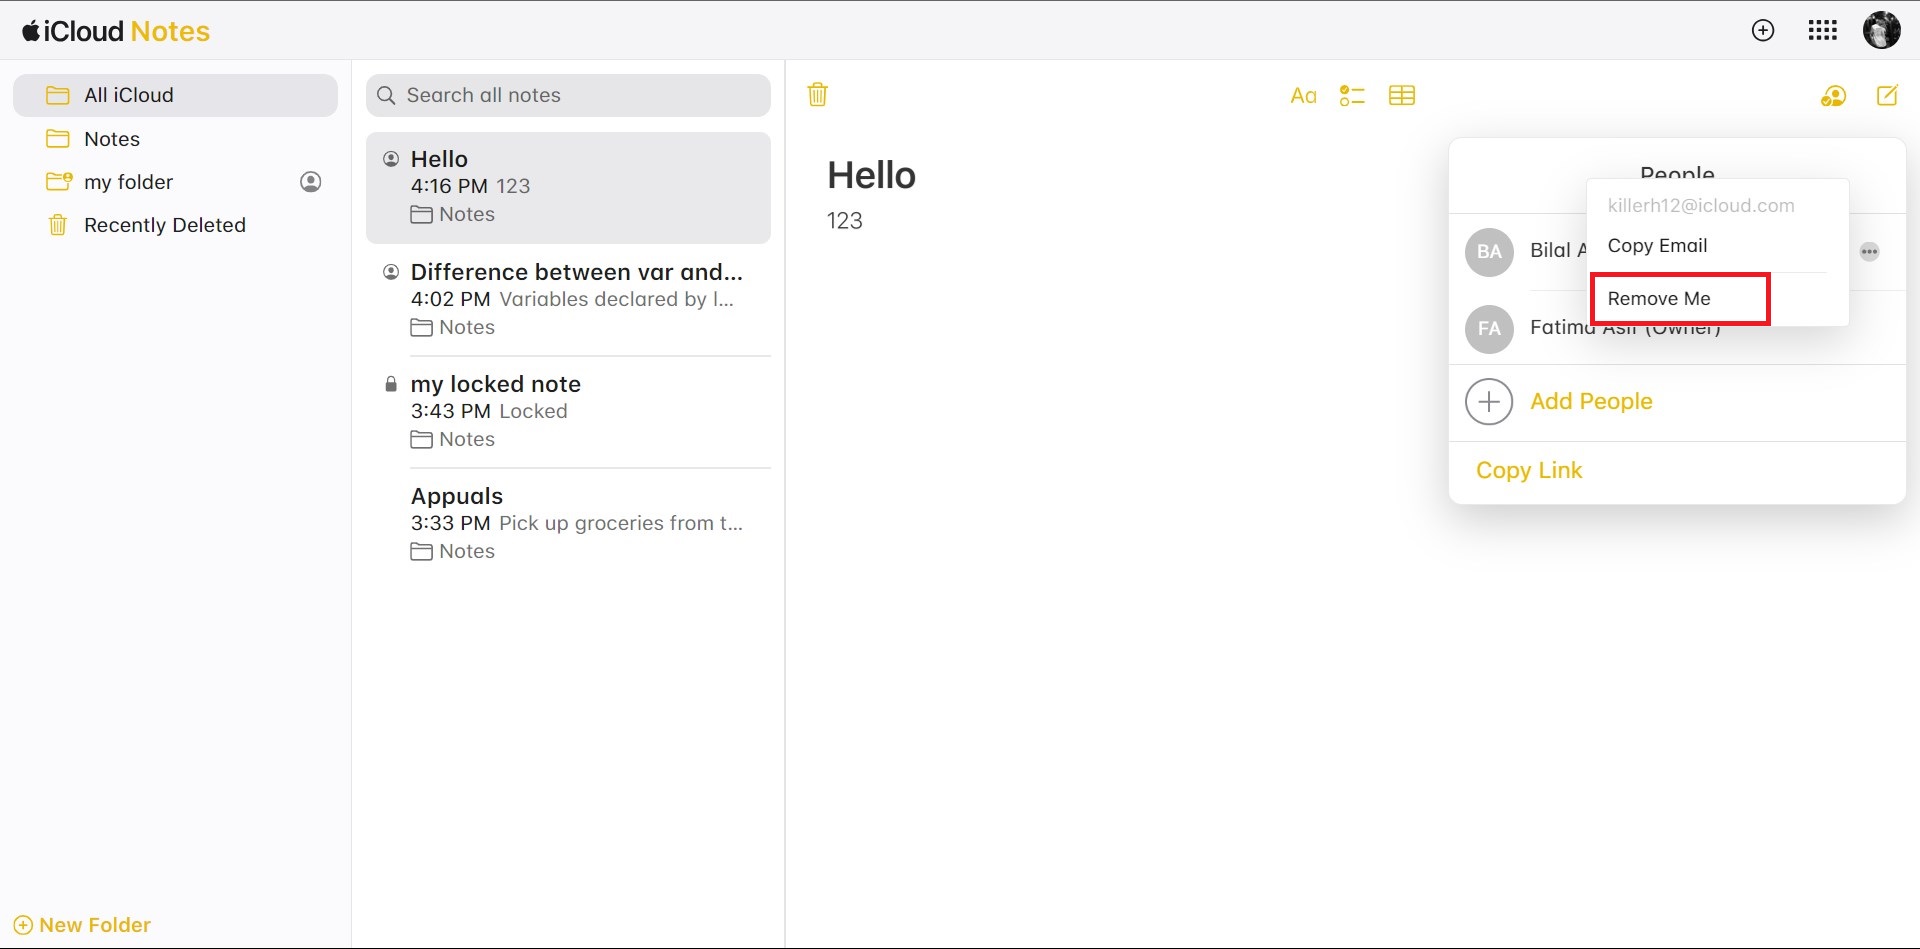 Click on Remove me
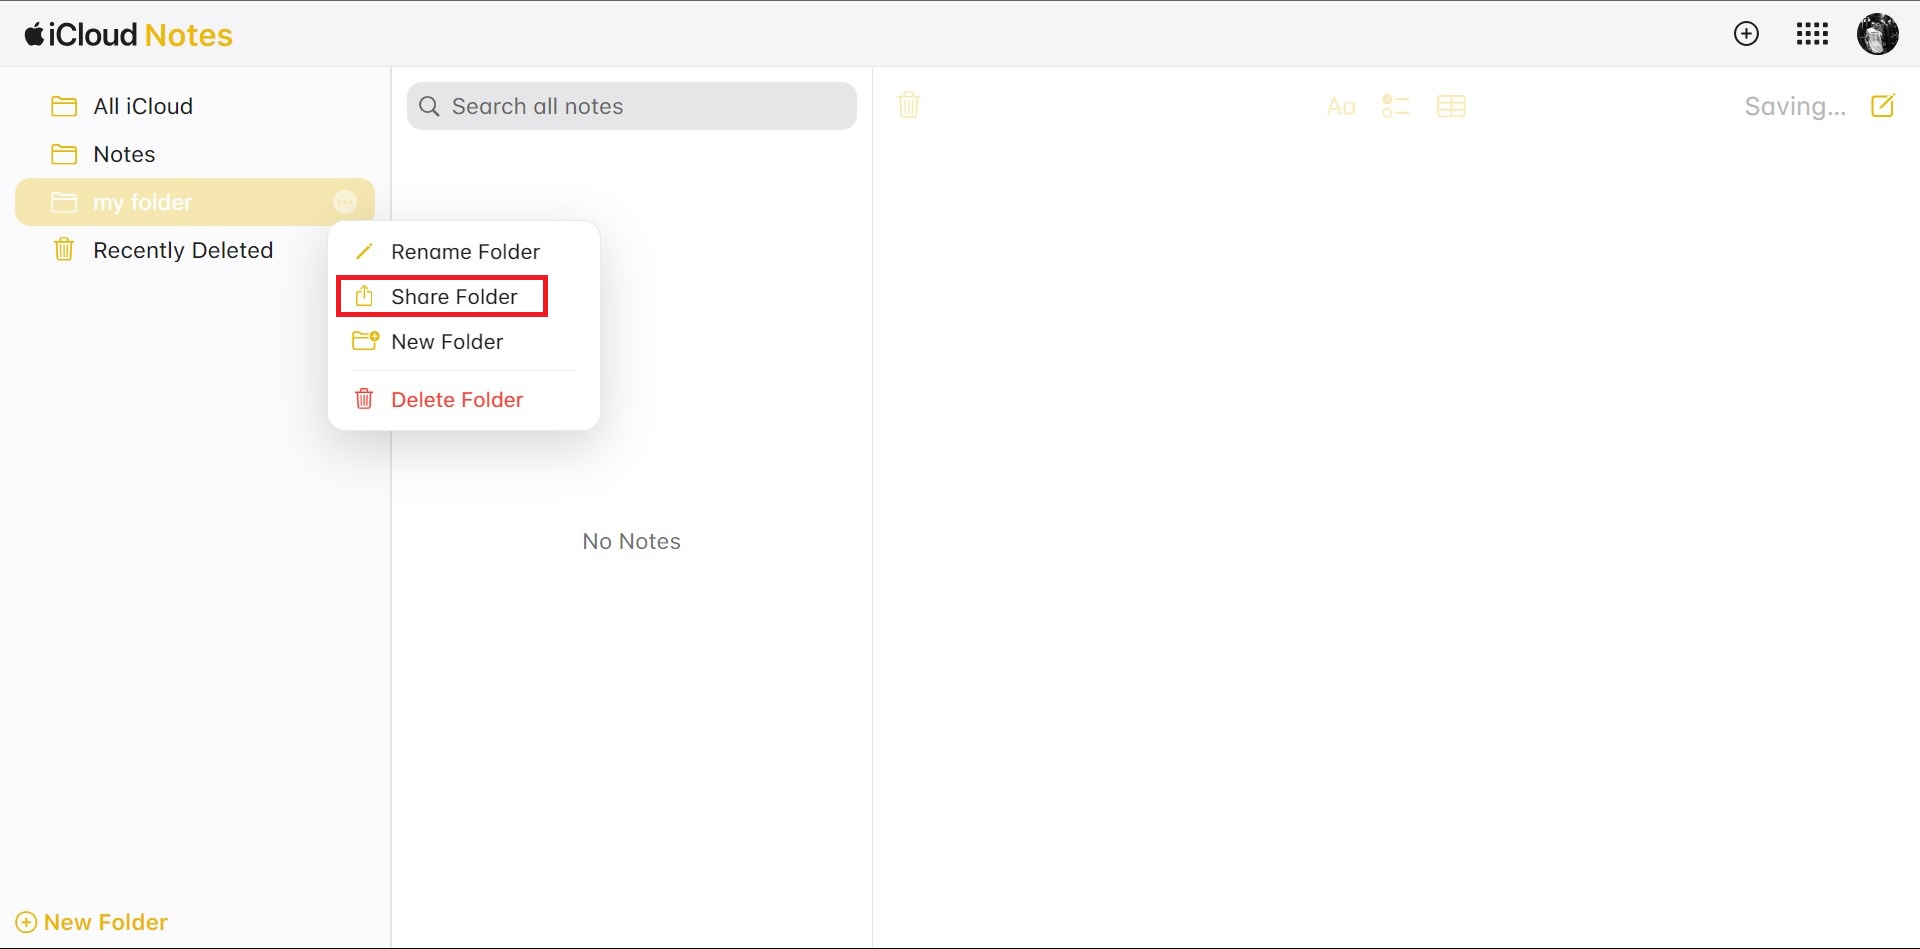
Step 10: Share Folders
You can easily share folders in Notes on iCloud.com to collaborate with others. Implement the following process to do so:
↪ Share Folders:
- In Notes on iCloud.com, hover to the right of the folder you want to share in the sidebar.
- Click the More button, then select “Share Folder” and “Share Options“.Select Share Folder
- Finally, choose the Sharing Option:
- Email: Select “Email,” specify participant permission levels, and add email addresses. Write an optional message and click “Send.”
- Copy Link: Choose “Copy Link,” add participant email addresses or phone numbers, and set permission levels. Click “Share.”Choose Share Options
 Select Share Folder
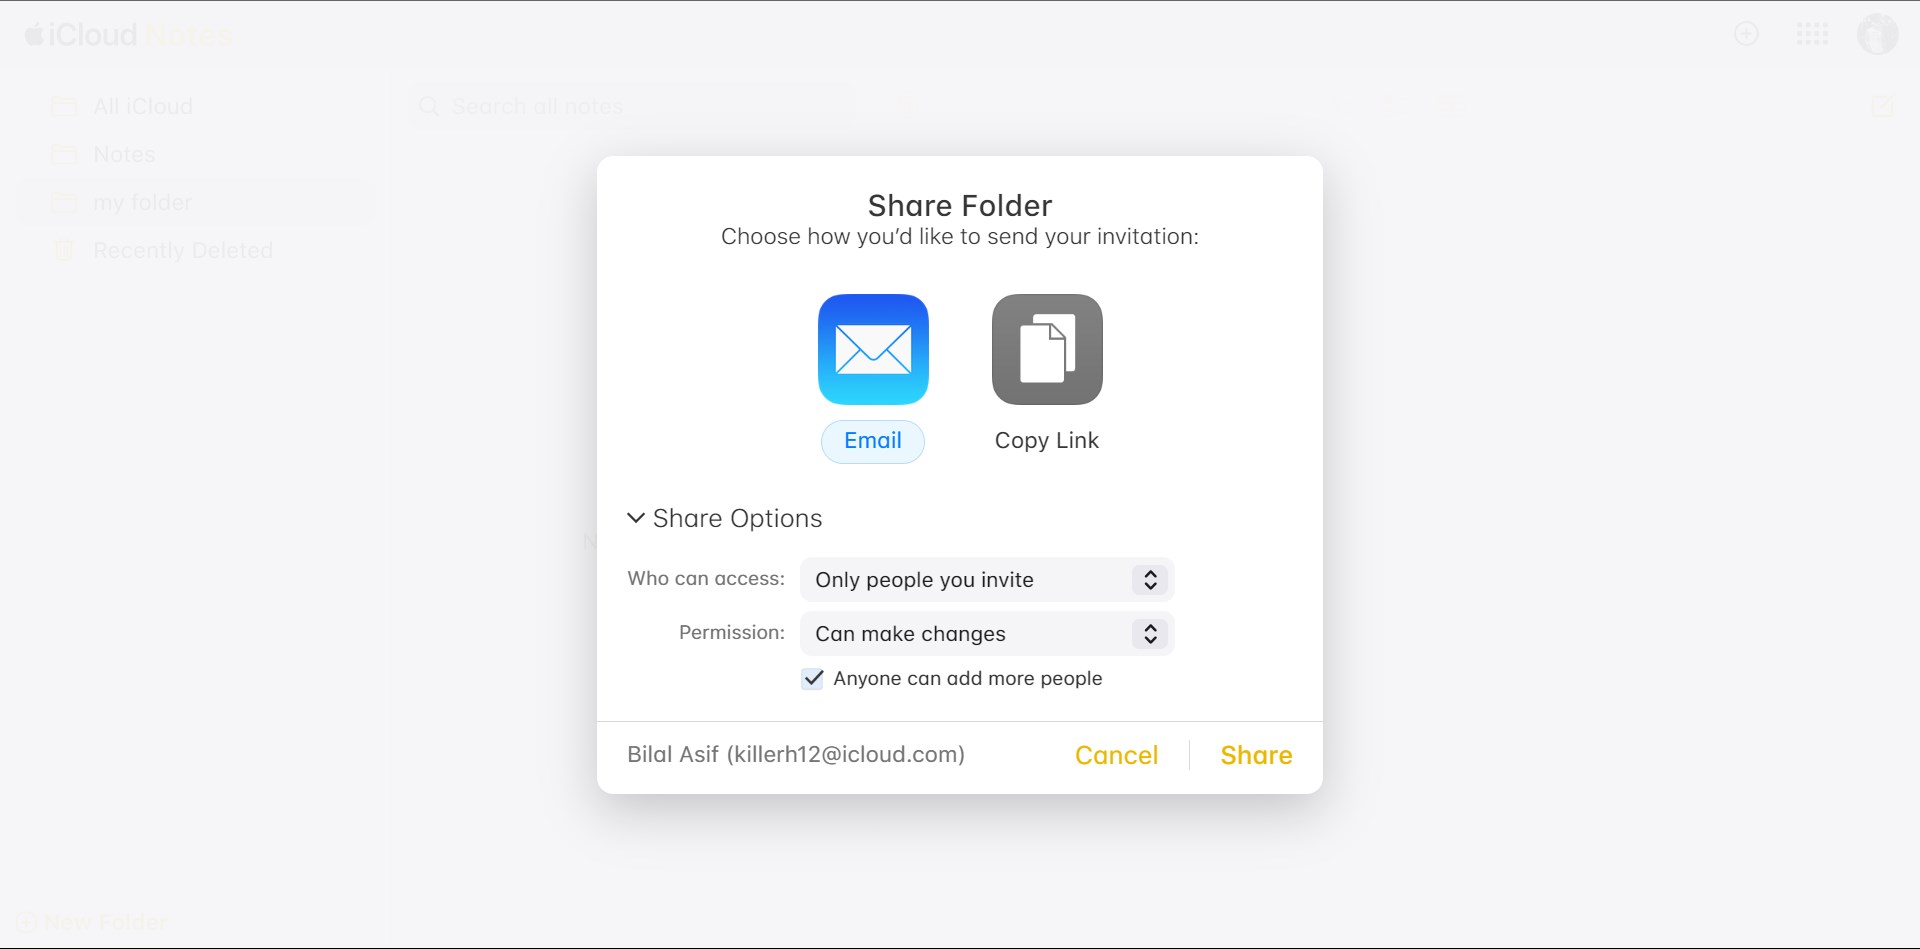 Choose Share Options
NOTE: Folders containing locked notes cannot be shared
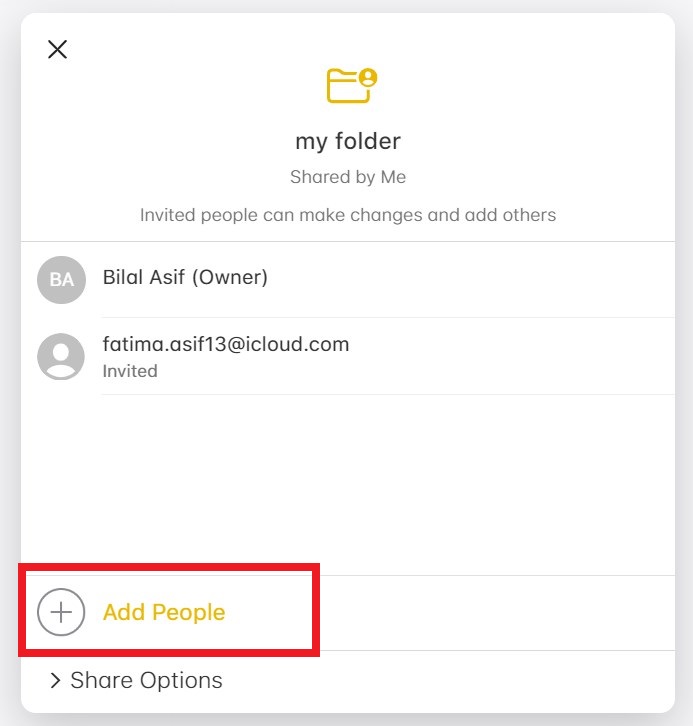
↪ Manage Participants in a Shared Folder:
- Click the “Manage Participants” button next to the shared folder in the sidebar.
- Now, Manage Participants:
- Click “Add People” at the bottom of the participants list.
 Select Add People
 - Hover over a participant’s name, click the More button, and adjust their permissions.
- Hover over a participant’s name, click the More button, and select “Remove Access.”
 Select Remove Access
- Click “Add People” at the bottom of the participants list.
 Select Add People
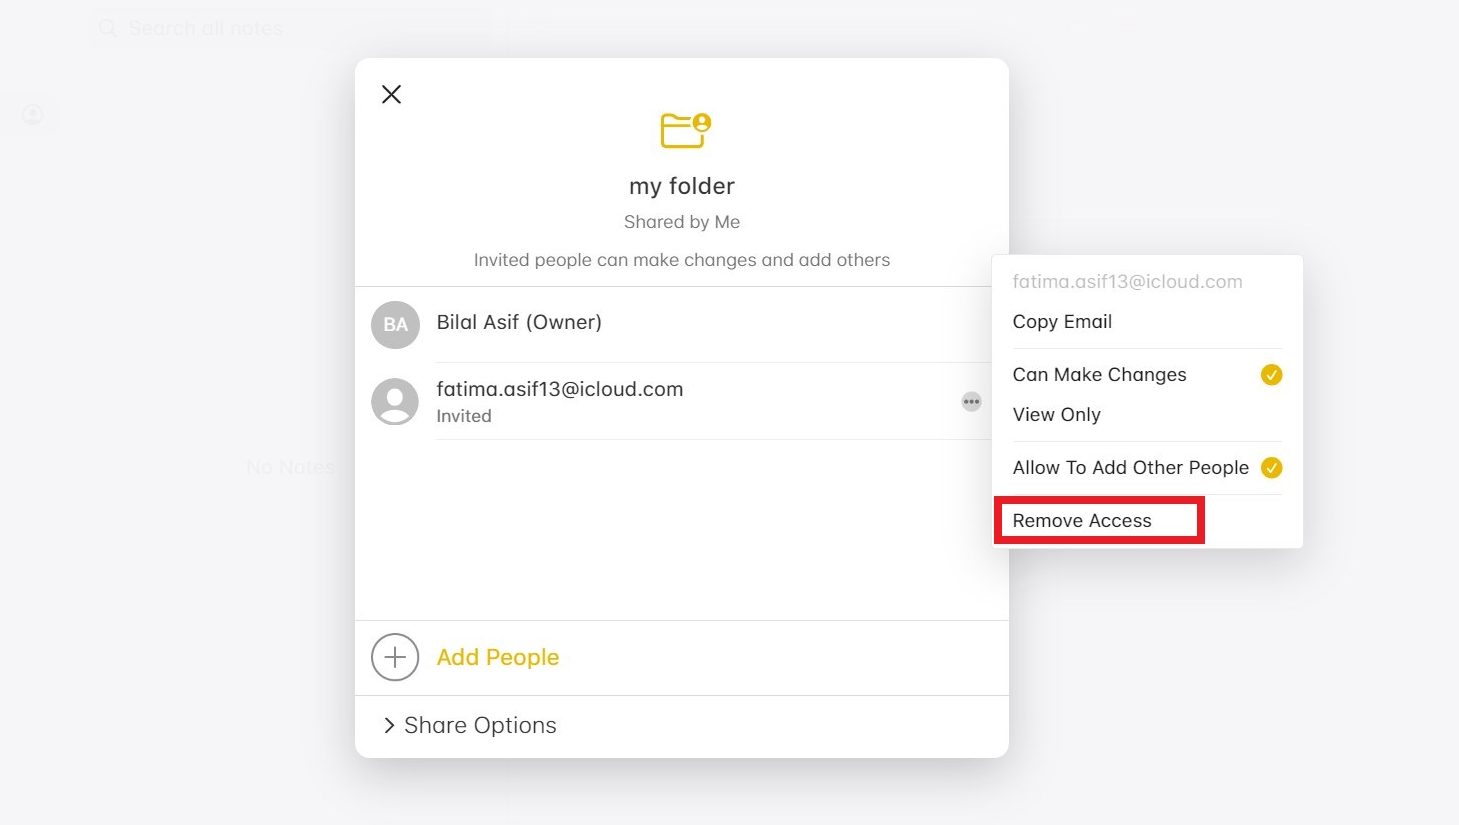 Select Remove Access
Tip: Adjust participant permissions directly from a shared note by clicking “View Participants” and then “Manage in Shared Folder.”
↪ Remove Yourself from a Shared Folder:
- Click the “Manage Participants” button next to the shared folder in the sidebar.
- Now, hover over your name, click the More button, and choose “Remove Me.“
 Select Remove Me
 Select Remove Me
NOTE: Only the owner of a folder can stop sharing it
READ MORE: 10 Easy Ways to Send Large Files Over Email [2024 Update] ➜
So synchronisieren Sie Notizen auf allen Geräten (einschließlich Nicht-Apple-Geräten)
Um Notizen auf allen Geräten zu synchronisieren, auch auf Geräten, die nicht von Apple stammen, können Sie verschiedene Methoden verwenden. Hier haben wir ausführlich erklärt, wie Sie das tun können. Also. Lasst uns darauf eingehen.
↪ Für Apple-Geräte (iPhone, iPad, iPod, Mac)
- Stellen Sie sicher, dass iCloud für Notizen auf Ihrem iPhone/iPad aktiviert ist.
- Gehen Sie zu Einstellungen > [Your Name] > iCloud > Notizen und schalten Sie den Schalter um, um die Synchronisierung von Notizen mit iCloud zu aktivieren.
- Jetzt werden Ihre Notizen auf allen Ihren Apple-Geräten synchronisiert, auf denen Sie mit derselben Apple-ID angemeldet sind.
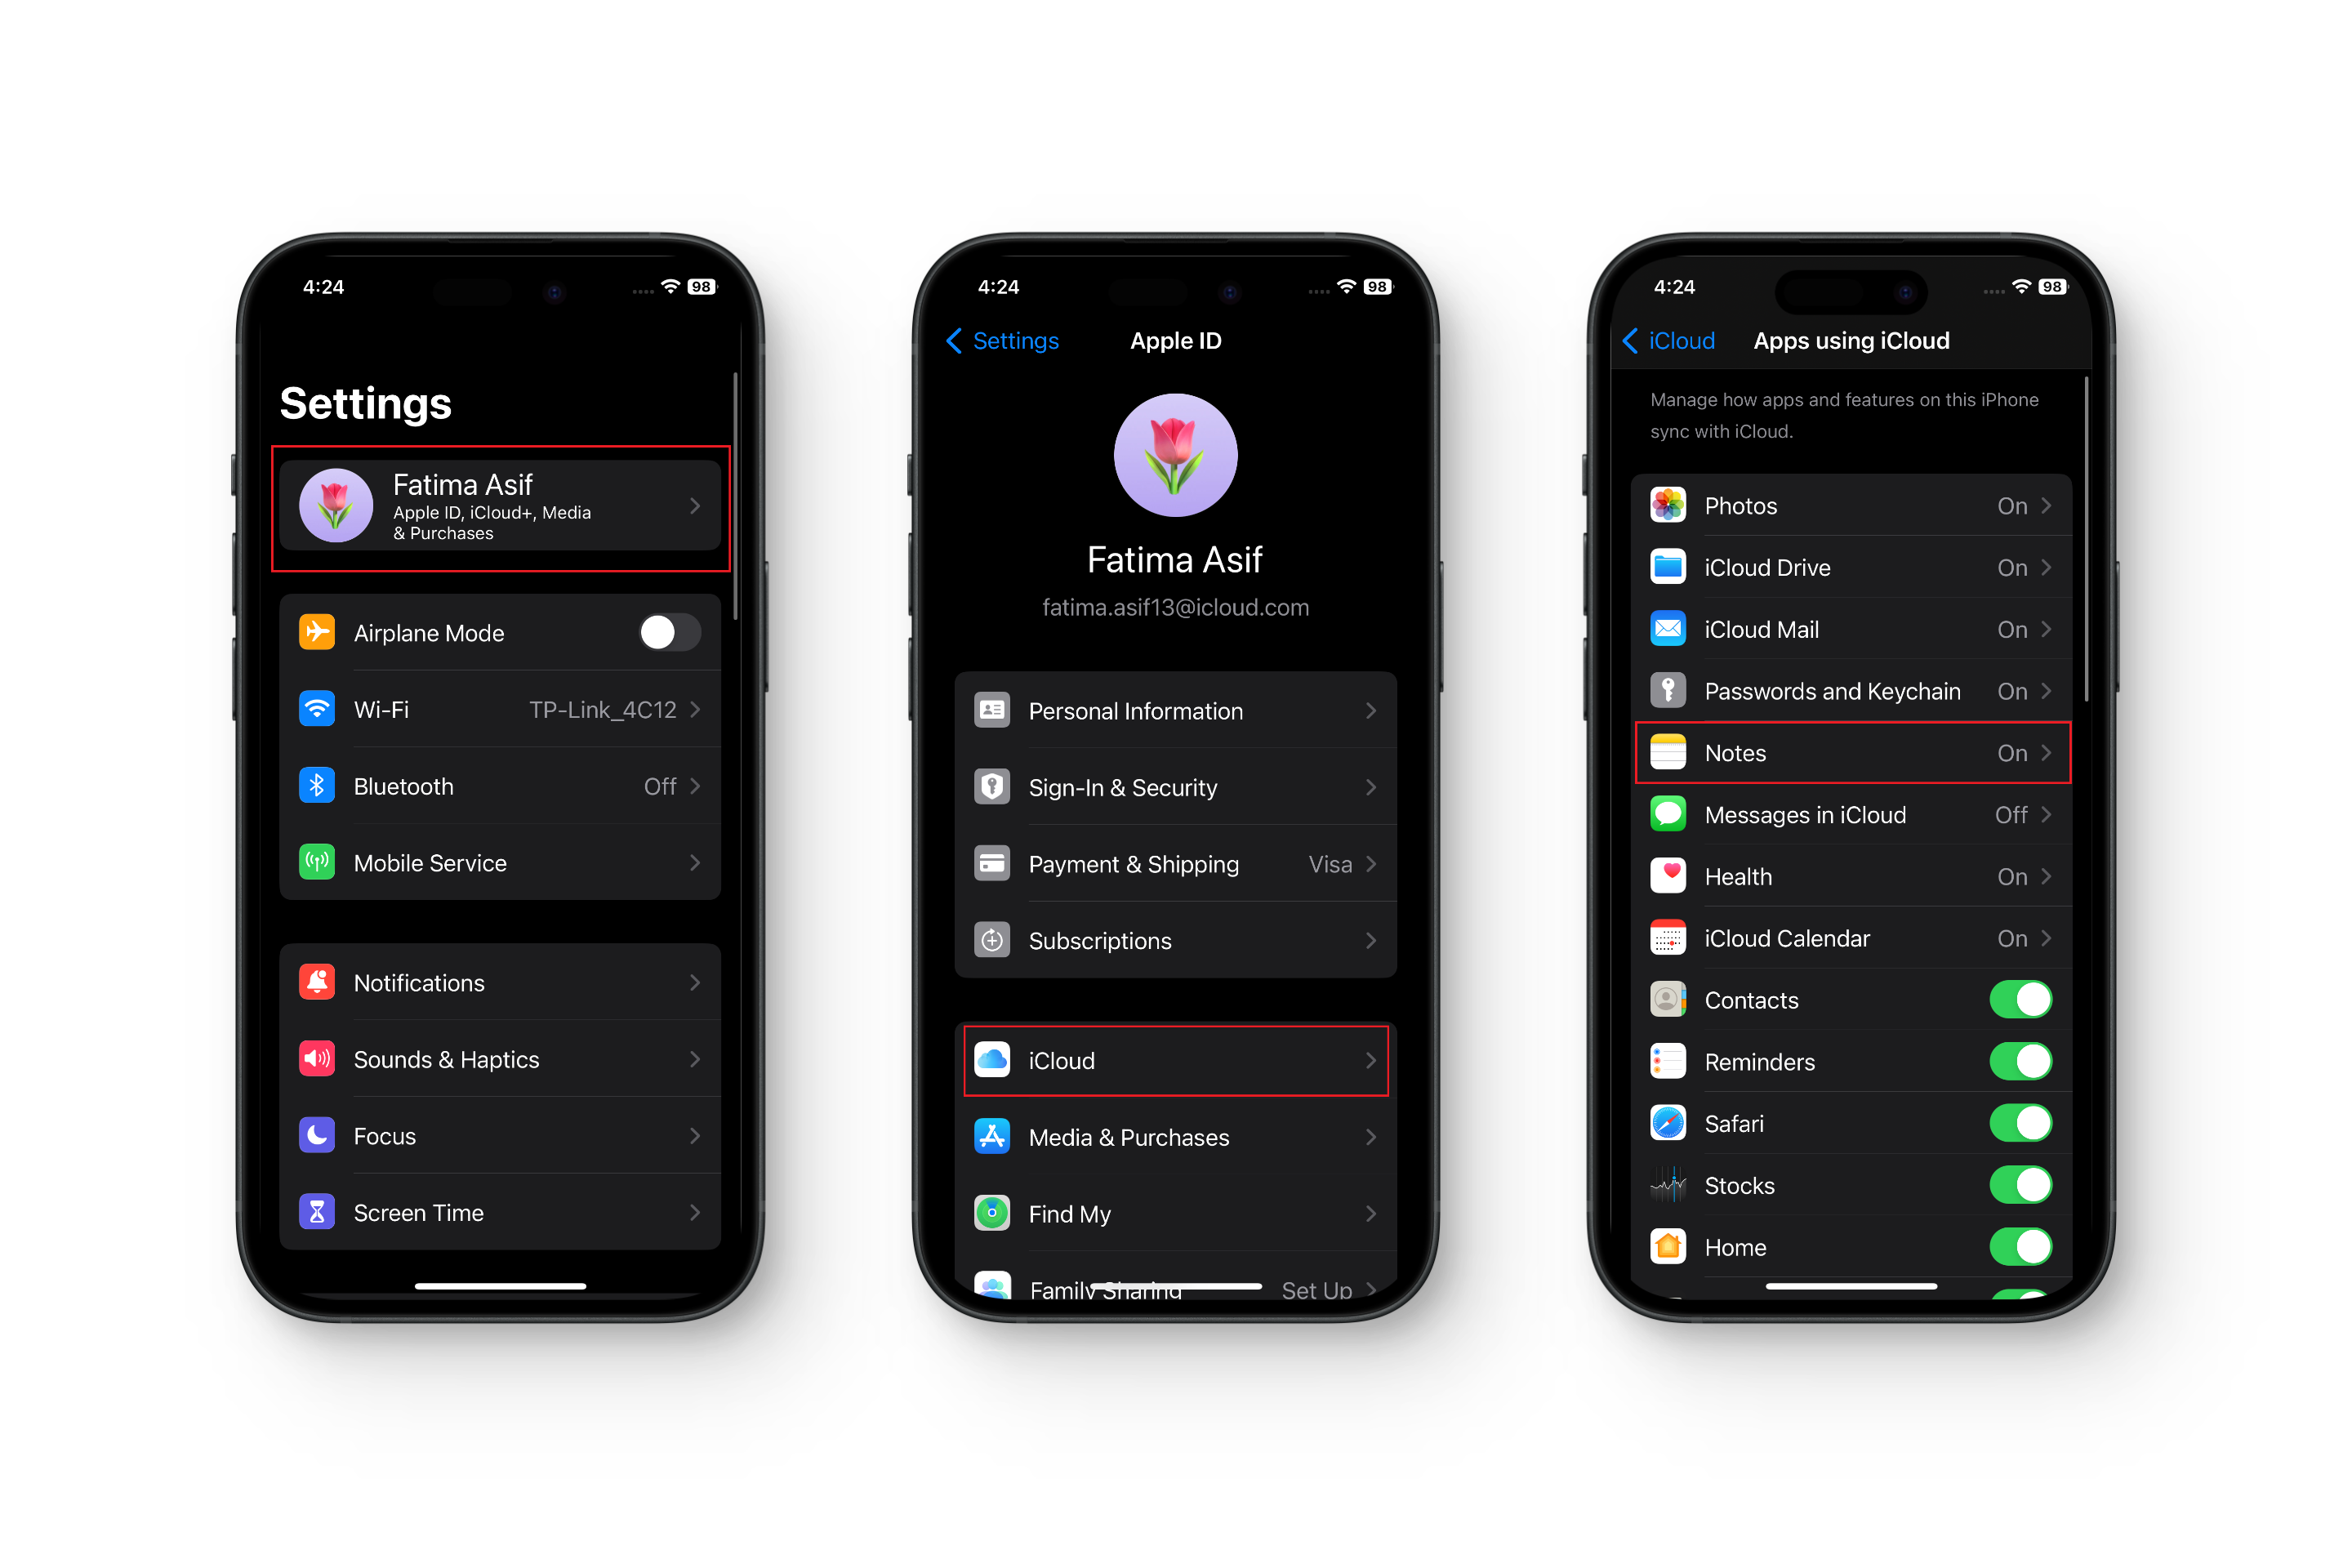 Einstellungen > iCloud > Notizen
↪ Für Nicht-Apple-Geräte (Windows/Android)
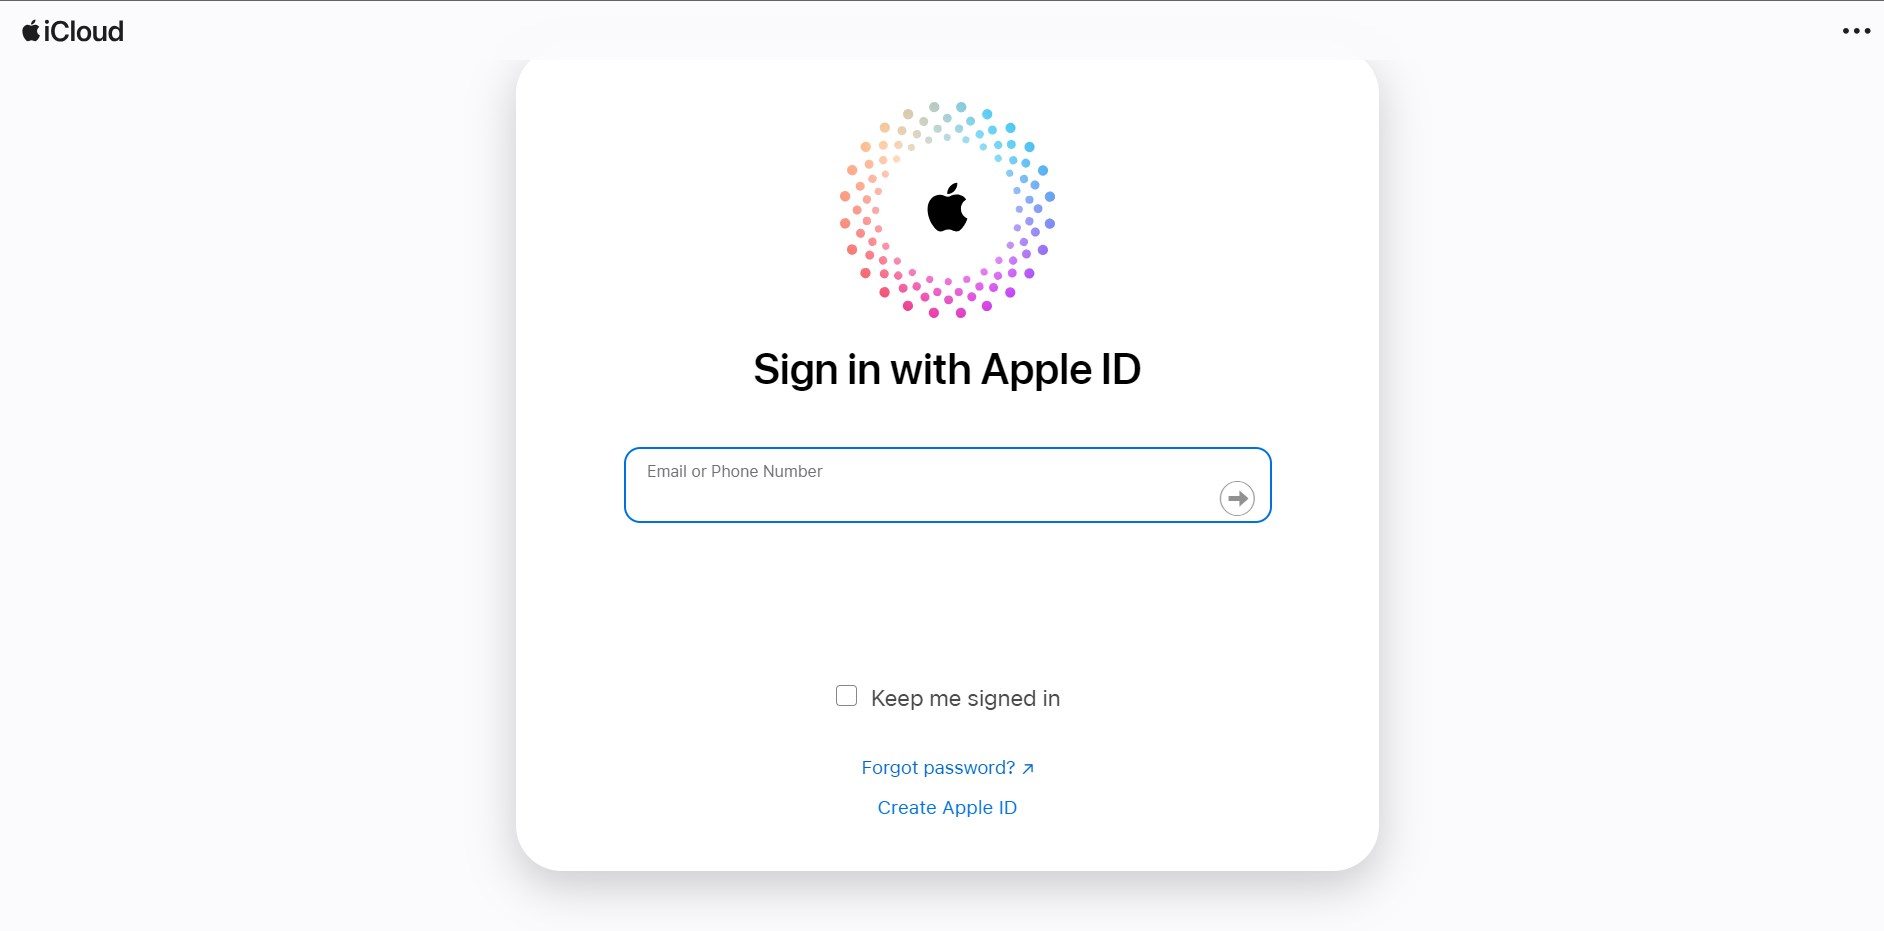
Durch die Nutzung der iCloud-Weboberfläche können Sie von jedem Browser aus auf Apple Notes und andere Apple-Dienste zugreifen, egal ob auf Windows- oder Android-Geräten. So greifen Sie über iCloud in einem Webbrowser auf Apple Notes zu:
- Besuchen iCloud.com in einem Webbrowser.
- Melden Sie sich mit Ihren Apple-ID-Anmeldeinformationen an.
 Geben Sie Ihre Anmeldedaten ein
 - Wenn Sie dazu aufgefordert werden, schließen Sie den Zwei-Faktor-Authentifizierungsprozess ab.
 Code eingeben
 - Klicken Sie nach der Anmeldung auf „Notizen“, um auf die webbasierte Version von Apple Notes zuzugreifen.
 Wählen Sie Notizen
 - Hier können Sie Notizen anzeigen, bearbeiten und erstellen sowie diese mit anderen iCloud-Benutzern teilen.
 Geben Sie Ihre Anmeldedaten ein
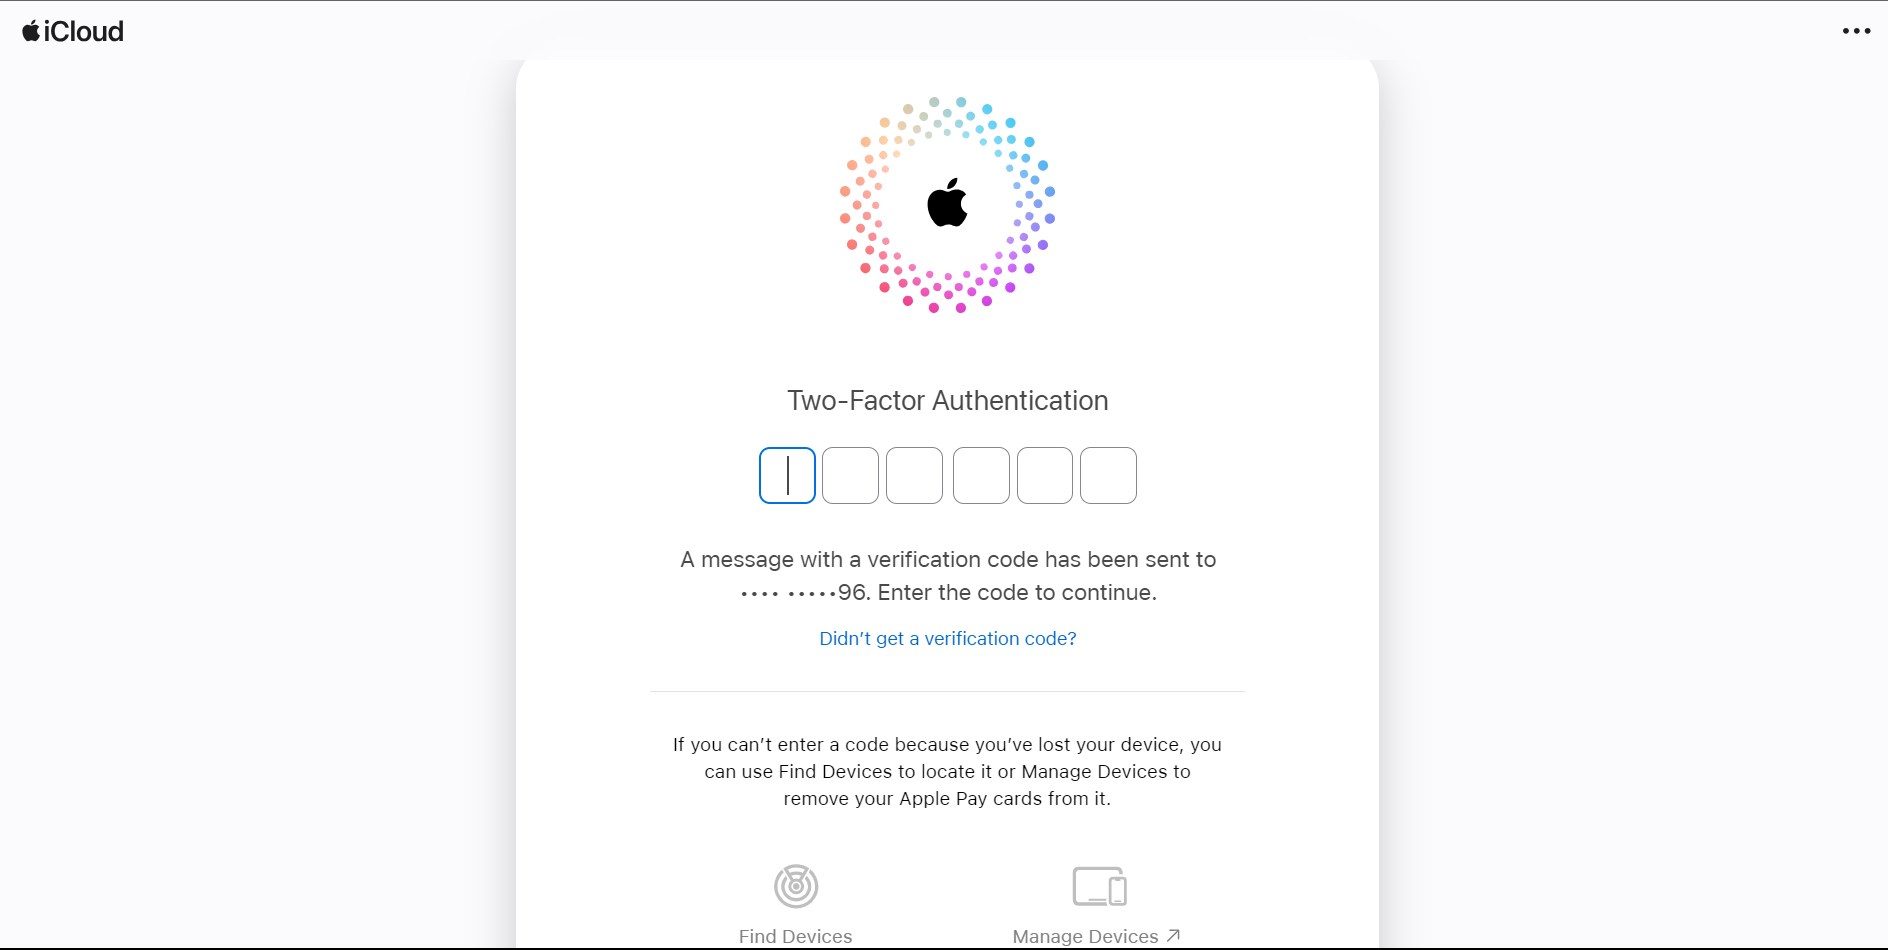 Code eingeben
 Wählen Sie Notizen
Tipps und Tricks zur Verwendung von Notizen
Hier sind einige nützliche Tipps und Tricks, um Apple Notes und iCloud optimal zu nutzen:
- Nutzen Sie Checklisten zur Aufgabenverwaltung.
- Organisieren Sie Notizen zur besseren Kategorisierung in Ordnern.
- Arbeiten Sie mit anderen zusammen, indem Sie Notizen oder Ordner teilen.
- Greifen Sie von jedem Webbrowser aus auf Notizen auf iCloud.com zu.
- Nutzen Sie die Siri-Integration zum freihändigen Notieren auf iOS-Geräten.
 iCloud-Notizen | iDownloadBlog
Beheben häufiger Probleme
Hier sind drei allgemeine Tipps zur Fehlerbehebung für Apple Notes und iCloud:
- Notizen werden nicht synchronisiert: Stellen Sie sicher, dass die iCloud-Synchronisierung für Notizen auf allen Geräten aktiviert ist, und überprüfen Sie die Internetverbindung.
- Fehlende Notizen: Überprüfen Sie den Ordner „Zuletzt gelöscht“ in Apple Notes und stellen Sie sicher, dass Notizen nicht archiviert oder an anderer Stelle gespeichert werden.
- Probleme bei der Zwei-Faktor-Authentifizierung: Stellen Sie sicher, dass für die Zwei-Faktor-Authentifizierung die richtigen Codes verwendet werden und dass den Geräten vertraut wird.
LESEN SIE MEHR: So synchronisieren Sie Fotos von einem iPhone mit einem Mac – 4 einfache Möglichkeiten ➜
Letzte Worte
Zusammenfassend lässt sich sagen, dass Apple Notes und iCloud praktische Tools zum Organisieren und Zugreifen auf Ihre Notizen auf allen Geräten bieten. Mit Funktionen wie Synchronisierung, Zusammenarbeit und sicherem Sperren wird die Verwaltung Ihrer digitalen Notizen effizient und problemlos.
Denken Sie daran: Wenn Sie auf Probleme stoßen oder Fragen zur Verwendung von Apple Notes oder iCloud haben, wenden Sie sich jederzeit an Apple-Support zur Hilfe. Nutzen Sie die Einfachheit und den Komfort dieser Tools, um Ihre Produktivität zu steigern und Ihren digitalen Workflow zu optimieren.
FAQs
Gibt es eine Begrenzung für die Anzahl der Notizen, die ich in Apple Notes speichern kann?
Bei Apple Notes gibt es keine bestimmte Begrenzung für die Anzahl der Notizen, die Sie speichern können. Notizinhalte werden jedoch auf Ihr iCloud-Speicherkontingent angerechnet, sodass Sie möglicherweise Ihren Speicherplan aktualisieren müssen, wenn Sie Ihr Limit erreichen.
Kann ich offline auf meine Notizen zugreifen?
Ja, Sie können auf Apple-Geräten offline auf Ihre Notizen zugreifen und diese bearbeiten. Alle offline vorgenommenen Änderungen werden automatisch synchronisiert, sobald Ihr Gerät wieder eine Verbindung zum Internet herstellt.
Ist es möglich, Notizen in Unterordnern zu organisieren?
Derzeit unterstützt Apple Notes nicht das Erstellen von Unterordnern direkt in Ordnern. Sie können Notizen jedoch organisieren, indem Sie zur besseren Kategorisierung beschreibende Titel und Tags verwenden.


![So prüfen Sie auf dem Mac auf drei verschiedene Arten [2024]](https://okidk.de/wp-content/uploads/2024/03/inspect-on-mac1-1-768x453.jpg)
